There is no better way to become familiar with all the terms and components of a smokepole than to build it one piece at a time. Seeing how a trigger assembly works with a percussion lock and where the spark has to travel provides complete insight into why holding steady through the shot is critical.
Traditions Performance Firearms has “Build-It-Yourself Rifle Kits,” providing all the components to put together your custom rifle from the stock up. There are six models to choose from including percussion models in Kentucky, Deerhunter, Crockett, Hawken Woodsman and Frontier styles. The Frontier is the only one that comes with either flint or percussion ignition. All models are old-style guns with hardwood stocks, steel barrels and brass components. You literally build the gun yourself, from sanding and finishing the stock to bluing the barrel. Complete and simple instructions allow you to become a savvy muzzleloader enthusiast who will understand the principles of loading and ignition.
I’ve always wanted a Kentucky Rifle, with the long wooden stock extending the length of the barrel. Building the gun was a fun project that took a couple of evenings, but it has generated new goals for me to harvest a deer with the rifle I built. Some skill is required for finishing the wood and fitting parts together carefully, but overall it is a great project for even a person with little or no carpentry or gunsmithing skills.
Here’s how it happened.
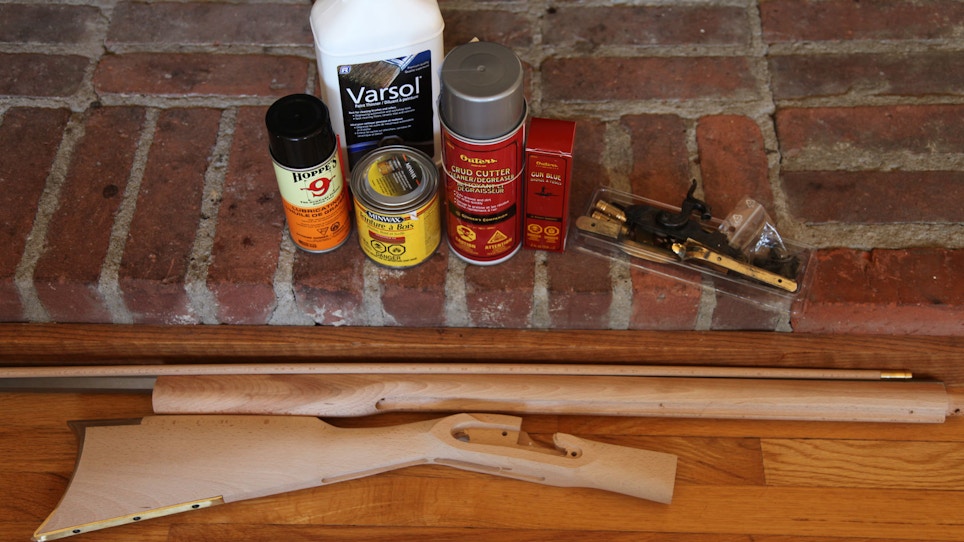
Everything needed to make a working gun comes in a single package. Once opened, it’s easy to inventory parts and store them in containers until they are needed in specific stages of the build. After going through the entire gun and making everything fit properly together, I started finishing the stock. Much of the fine tuning was done with sandpaper, but a chisel was needed in a few spots. The stock was rough cut and needed to be finished with a medium grit paper, followed by fine. There are companies that offer gun stock finishing kits, which make it easy with step-by-step instructions. However, I opted to purchase a wood stain and do it all myself.
Of course, I chose a stain color called “Gun Stock,” offering a medium-brown finish to the already dark hardwood. It seemed like a natural color selection. Before the stain was applied I fit the components together dry, drilled any required holes and set it up so I wouldn’t have to sand finished wood.
Fitting the parts to fit into the stock properly was the biggest time consumer. On the percussion lock assembly, extra sanding was required, but nothing major. Holes for screws were predrilled to ensure the stock didn’t crack when they were tightened down. Some stocks might require more shaping with a chisel or carving tool, but it’s best to remove wood sparingly so everything fits tight together in the end.
The stain was applied in small amounts with a rag and worked into the wood. I tested the color first on a separate piece of wood to ensure I liked it and could work the stain evenly. Two coats of stain provided adequate protection and the perfect color and look of wood grain for what I wanted. Because it’s a traditional gun I might oil the stock, but don’t want a shiny, more modern finish. Traditions recommends finishing with polyurethane for a protective finish.
The barrel needs to be treated with bluing or browning, and Birchwood Casey makes an easy-to-use kit for finishing the metal. I opted for bluing and found it easy to apply with a sponge. Care has to be taken to get even color, and if there is streaking from the first attempt, a second coat can be applied. When complete, apply a quality gun oil to the barrel to maintain the finish.
Every kit is different, and the instructions indicate the Kentucky rifle requires an intermediate skill level, meaning you should expect to do some filing of both metal and wood to make them fit together properly. With some patience, you can expect to be rewarded with a working replica gun from the muzzleloading era. The lock assembly is one piece, and in my kit it fit perfectly. I simply pushed it into the stock with a snug fit. However, the trigger guard was too long for the machined space in the stock, so I filed the end and chiseled a portion of the stock until it fit tight. Any alterations should be done sparingly so you don’t have to go back and fill the stock, which will show in the end product.
Some of the screw holes were predrilled, but others needed to be done. Make sure to drill straight and at 90 degrees to the stock to ensure screws pull parts straight and not off-center. The screws should be completely turned into the wood and backed out several times, as a way to burnish the threads and ensure a proper fit.
It was then time to try out the lock assembly and make sure it worked properly to engage the sear. The metal parts of the lock assembly need to be checked for burrs or other visible problems that can be corrected before the unit is screwed in place. When you pull the hammer back to the half-cocked position you will be able to see the sear fall into its notch. Once you verify the sear is properly seated, you can place the hammer in the full cock position and see if it engages into the second position on the sear. Once everything is working smoothly you can put the assembly snuggly into the stock. If sanding or filling and wood putty is required, this is the time to do it. Again, I dry fit all the pieces before I stained my stock to ensure I wouldn’t be sanding finished wood.
The lock plate, or side of the percussion lock assembly, should be fastened in place with screws and washers in the holes you predrilled. The entire percussion lock assembly is preassembled with 11 working parts, and having already confirmed the cocking hammer and sear work, it is easy to fasten into the stock.
The project moves along quickly, and the barrel and trigger assemblies can now be put into the stock. A tang on the back edge of the barrel overlaps the stock so it can be fastened with a tang screw. Test the trigger assembly and fit it into the precut slot in the bottom of the stock. The trigger needs to fit without movement, and some sanding may be required to position it so it doesn’t move. After the trigger is in place, the thimble/rib sling swivel assembly can be installed on the underside of the barrel and the rib screws.
With the Kentucky rifle, the stock comes in two sections that are joined by a plate. The barrel should fit without tight spots into the inletting cut for it.
Remove the barrel and measure the distance from the muzzle to the center of both tenons on the bottom of the barrel. Tenon pins are used to hold the stock on the bottom of the barrel, so be precise with the measurements or the pins will not fit. Once all measurements are made and marked on the stock, tape the barrel in place and drill the holes for the pins. You should be able to tap the pins into place when done.
The overview provided here might sound daunting, but the process is really relatively simple. I’ve tried to provide detail to show the basics of a muzzleloading rifle and how it goes together. The kits are very comprehensive and provide detailed instructions that are easy to follow. The most difficult part about building your rifle is stopping between steps. Once you get started you’ll want to move directly to the next. Seeing each part and knowing how they fit and work together provides a complete understanding about muzzleloading and what is required to make a gun go bang.
The instructions are very complete with all kit guns and most people should be able to build their own rifle without difficulty. Taking your time, pre-fitting all components and double checking things before moving to the next step will ensure the gun is built correctly and will work perfectly. There are great troubleshooting notes in case there are problems, and you can always contact Traditions if you have questions.
Once the entire gun is put together you can polish the brass, oil and shine the barrel and show it off to your friends. The only decision after that is whether you’re going to hang the rifle over the mantel or head to the range to work up a load for a round ball and patch.
Your finished rifle can be used for hunting and target shooting and is not just a piece to show off like art. The 33 ½-inch white octagonal barrel has a 1:66 rifling twist, making it ideal for patch and ball. It is a .50-caliber and uses No. 11 percussion caps for ignition. Along with the traditional hardwood stock, the barrel is also fitted with fixed blade sights. Many old timers have told me the best way to learn how to shoot is with open sights, so your new muzzleloader might be the perfect gun for you to start with. If not, it will provide more of the challenges our forefathers had in order to bring game home for the pot when it was much more crucial to be successful.c
