Given their current popularity it’s hard to imagine that scopes were initially slow to catch on with hunters. Though they were introduced in the 19th century, scopes really only became the primary sighting system for hunters in the last 75 years, and even as recently as the 1980s many hunting rifles came equipped with iron sights, either as the primary optic system or a backup in case of scope failure.
Since then, though, the variable-power optic has become the overwhelming choice of hunters. Machining and materials technology have made it possible for companies to offer affordable scopes with features that were limited to premium glass just a few decades ago. Multicoated lenses and better glass have improved optical clarity in virtually all light conditions, and improved technology has allowed hunters to extend their maximum effective range.
Mounting a scope isn’t difficult, but there are some basic points that you must learn. Here are the five primary skills you’ll need to find — and mount — the right scope for your firearm.
1. Choose Your Scope and Hardware
The critical first step in mounting a scope is being certain that you have the proper optic, bases, rings and tools. Select a scope with a magnification level that is right for you. The 3-9x40 power variable scope is the classic option, sort of the .30-06 of the hunting optics world because it is such a versatile setup. Most scopes come with either a one-inch or 30mm main tube, so you’ll need to buy your rings accordingly. Some rifles like CZ’s 550 and Ruger’s Hawkeye come with integral bases machined to the receiver, but in most cases you’ll need to buy bases that fit your rifle. Be sure that the scope rings are high enough to accommodate the objective lens (this is usually only an issue with scopes with particularly large objectives like 56mm). Also, having a scope mounting tool or Torx wrenches is critical, and a wrench with an inch-pounds pressure readout is important.
A loose base will likely cause your rifle to lose accuracy. This step is crucial in mounting a scope.
2. Mount Bases and Rings
Properly mounting your bases is absolutely critical since a loose base will ruin accuracy and may cost you game. Manufacturers offer suggested inch-pounds of torque to which you should tighten the bases, and you should always follow those guidelines (tighter is not always better). Some hunters prefer to add a locking solution to the threads of their base screws (Loctite Threadlocker 242 is most popular). That’s largely a personal choice; I’ve used rifles with and without Loctite and have had both work fine, but I have never had bases with a thread locking solution come loose. Tighten screws alternately to ensure an even hold. If you purchased separate bases and rings you can attach the bottom portion of the ring.
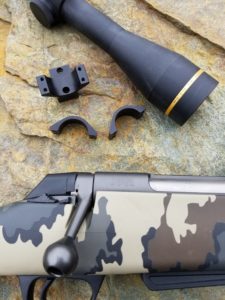
3. Align the Scope
With the bases and bottoms of the rings in place you can add your scope. Some people choose to lap their scope rings for a perfect fit, but for the average hunter it’s not absolutely necessary. However, I do like to wipe down both the interior of the rings and the exterior of the scope to be sure that there are no burrs or loose materials that could compromise fit or scratch the scope’s main tube. Many hunters level their scope — again, this is not absolutely critical, but it becomes more important if you plan to shoot long ranges. With the scope resting in the rings you can turn it so that the reticle appears to be aligned properly. The more scientific and accurate approach is to use a leveling kit like the ones available from Wheeler, which are simple and affordable, or to hang a plumb line with a weight and use that as a guide. You’ll also need to be certain that the scope is aligned within the rings for proper eye relief (nobody wants to get thumped in the forehead with a scope — believe me!). Check to be sure that your rifle functions properly with the scope in place. You should be able to operate the bolt, safety and so forth without banging your knuckles against the scope.
Related: 7 things to know before choosing a riflescope
4. Tighten Screws
When you are certain that everything is properly aligned, begin tightening the screws on the rings. As with the base screws, this should be done by alternatively tightening one screw and then another. Be certain to stay within the manufacturer’s guidelines for inch-pounds of torque when tightening. Many manufacturers recommend that you should be careful not to switch the tops and bottoms of horizontally split scope rings since minor variances in machining result in a tighter, more precise fit when using top and bottom ring halves that were machined together.
5. Bore Sighting

The ideal distance to start bore sighting is 25 yards. When you're on from 25, move back to 100.
Bore sighting is a simple process that will save time and ammunition at the range. If you don’t own a laser bore sighting device you can simply remove the bolt of a bolt action rifle and, with the rifle in a fixed rest, align the center of a target at 25 yards in the middle of the bore. Without moving the rifle, lift your head and look through the scope. Using the windage and elevation controls, align the crosshairs so that they are in the center of the target. With both the crosshairs and the bore centered to the same point of impact at 25 yards your first shot should be relatively close. I like to take a test shot at 25 yards to be sure that I am close, and if the bullet strikes the target (which it should) I then fine-tune for a near-center point of impact and move the target back to 100 yards. If you’ve done everything correctly, you will be close to center at that range with your first shot.
The alternative to manual bore sighting is laser bore sighting, either with a pin that fits snugly in the bore and emits a laser, or a magnetic laser unit that affixes to the muzzle. Since these lasers are typically more precise than the method of looking down the bore, I usually (if conditions allow) skip the 25-yard sight-in and go directly to 100 yards. At that range a target with a reflective surface (you can use aluminum foil on a cardboard box in a pinch) should reflect the laser light, and you can simply adjust the scope so that the crosshairs are aligned with the laser, your theoretical point of impact. Your first shot may not be a bull’s-eye, but you should hit a standard paper target at 100 paces. Remember when using a laser bore sighting device not to look directly into the laser and always remove the laser before firing.