The sun was still a cold yellow ball on the horizon when my new partner pulled the trigger on our first coyote of the day. He was new to predator hunting, so I immediately taught him the You shoot ’em, you drag ’em’ rule. He took that in stride and once he’d dropped the coyote at my feet I said, “And now you’re going to find out the worst thing about hunting with me.” His face took on a puzzled expression as I left him hanging while digging in my backpack. Quickly holding up my camera, I said, “I take pictures — lots of pictures.” He took that in stride, too, and thought it was cool when his photo showed up in a local hunting magazine.
Coyotes like that one and other assorted predators and varmints are what I hunt exclusively these days. And even though my game animals are much smaller than the big game my friends hunt, I’m still proud of all my trophies and like to take pictures of what I harvest. However, getting good photographs of my trophies proved difficult for me at first and it took a long time to achieve the quality pictures I was after. From what I see on the internet and in some magazines, many other predator hunters have problems getting good photos, too. In the hopes this will shorten someone else’s learning curve, here’s what I’ve learned about photographing those trophies that are special to us.
First, don’t get the idea I’m a professional photographer, I’m not. I make part of my income as a writer, and photography supports that endeavor. I own two good Nikon cameras, one of which is a simple point-and-shoot, and the usual cell phone. There are other good camera brands, too, and all depend more on the operator’s skill and effort than on the brand.
Whatever camera you choose, pro equipment is not necessary to take good photos. Today’s digital cameras and cell phones are so uniformly excellent that only a desire to produce a quality photo and the willingness to learn is necessary. And the first thing everyone needs to learn about their camera is where the instruction manual resides.
Modern digital cameras, even phone cameras, have more settings, gee-whiz features and processing power than my first desktop computer; and without a basic grasp of the settings available and how to change them quality images will be a sometimes event.
Camera Settings
All cameras or smartphones can let the camera make all the decisions involved regarding the technical details of taking a photograph, including things such as white balance, aperture and focus point. It’s usually labelled as “AUTO” or something similar. Serious photographers joke that the abbreviation stands for “AUTOmatically bad photos.” That’s a little harsh, but there is some truth to it.
However, to kick your photos up a notch, it’s important to move beyond that basic level.
One of the first things to learn is how to add flash; even those outdoor ones where that AUTO setting tells you no flash is required. Try a flash in those circumstances and see how it illuminates the shaded area under hat brims and separates the subject from the background. Photographers call it “fill flash,” and you’ll find it makes a huge difference in your photos.
The small sensors used in smartphones and compact cameras are great at keeping everything in focus, including near and far away objects. However, having only the subject of interest in focus and blurring the background slightly really makes the subject pop. So, learn to adjust the focus point and if your device allows it, blur the background slightly.
Another setting worth experimenting with is white balance, usually abbreviated as WB, with numerous sub-options marked by icons in the shape of light bulbs, sun and clouds. Typically, there is an automatic setting for white balance and it’s this one a camera defaults. However, manually setting the white balance to a cloud or shade position, makes pictures take on a warm tone most people find more attractive. Give it a try.
Experimenting with different settings and being able to see immediate results is one of the big advantages of a digital camera or smartphone.

Photographer Settings
Just like a camera, the person operating it has settings, too, and they are more important than the camera’s. Those settings are located between our ears, making them more difficult to adjust than the camera’s. However, a little training and self-discipline will reprogram them effectively. And the first thing needing adjustment is the button in our brains labeled Location.
If we photograph an animal in exactly the place it fell, we’ll be historically accurate but creatively bankrupt; because animals rarely expire in a location suited to a good photograph. I have it happen about once every hundred coyotes. Instead, whenever I want to photograph a coyote I’ve just shot, I stand beside where it fell and turn a complete circle, looking for an interesting background that conveys the essence of this hunt. If I shot it in an open field, I’ll move it up onto a rise and try to capture the feeling of a vast expanse in the background. If I took it in or near brush, I’ll look for an unusual tree or log to use as a prop, thus adding interest to the photo. Pay attention to the background and a photo will be better for it.
The next photographer setting is called the Pose button. This is where the hunter rearranges the dead animal to make it look good. All those photos of monster deer we see in newsstand magazines were carefully posed to look great, and if we want our varmints to look their best, we pose them. This means hiding blood and positioning the animal to look natural, with the face clearly visible. Sometimes, hanging the animal from a tree or fencepost can be effective, but pay attention to the side visible in the photograph.
Another photographer setting that always needs adjustment is the Down and Close button. Varmints and predators are by definition smaller than a 60-inch Alaskan moose, therefore, to get decent pictures of them, it’s important to get down to their level and move in close. And I don’t mean standing over an animal and leaning down close to photograph it. I mean getting down into the grass at the animal’s height and shooting it at eye level. And the smaller the animal, the lower we must go. I take most of my dead varmint photos with my belt buckle firmly in the dirt. Sometimes, instead of going down, it’s possible to move the animal up by putting it on a log or other raised platform; but we still have to get to its level and face it eye-to-eye to get a quality photo.
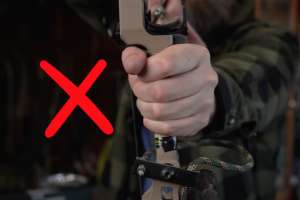
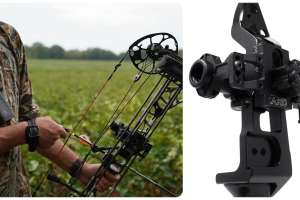
As hunters we love our guns as much as we do the animals we pursue, often wanting to include them in the photo as well. This works great if we remember to mentally throw the Subject switch in our heads. This little lever is the one that decides the subject of the photo, and it should only be about one thing, either the gun or the critter, not both. While we can have both in a photo it’s necessary to decide which is of primary interest and then emphasize the subject by making it the biggest, closest or in-focus object in the photo. Moving the other object into the background or pushing it out of focus will de-emphasize it and confirm what the picture is about.
This is a good place to talk about placing the hunter into the photo, too, using either the camera’s self-timer or via a hunting partner. Just remember the same rules about the subject apply. Normally we’ll want the animal to be the principle point of interest, which means it should be in front of the hunter. And to enable the camera to get close, the hunter needs to get down and near the animal. A 6-foot hunter standing over a much smaller coyote produces a poor photo; but if the hunter brings the animal up to his level, or gets down to the critter’s, a stand-out photo becomes a possibility.
And lastly, spin the Oblique dial in your mind and position the animal at an angle to the camera. This works exactly the same way as photos of people. A photograph of a person with shoulders square to the camera and looking directly into the lens is a mug shot; but photograph the same person looking over their shoulder into the camera and there’s enough added creativity to make the photo different. Apply this to dead varmint photos by setting the animal obliquely to the lens, normally with the head closest. Confirm the face is in sharp focus and you’re good to go.
Conclusion
Just like hunting, the rifle being used is much less important than the skills and abilities of the person squeezing the trigger. Photography works the same way, big fancy cameras are nice, but unnecessary for taking anything but commercial quality photos. Use what you have and focus your efforts on learning how to take quality photos, not on buying more gear. Study the photos in this and other magazines, get some instruction either in person or online and learn by doing. In the same way you can’t shoot varmints sitting on the couch, you can’t learn photography there either. Get out and do it.