
After waiting for the right shooting angle, I drew just as the buck fed below a lip in the steep, alpine habitat. I centered the 40-yard sight pin low on the mule deer’s vitals and kept aiming until the bow recoiled. The carbon arrow covered the distance in a blink, striking the buck solidly in the chest. He dashed away and then disappeared.
As I walked up to the buck on the sage-covered hillside, I became exhilarated. What an accomplishment, I thought. The day before, I had hiked all day long to reach this high-mountain saddle — carrying a fully loaded pack filled with camping gear, food and lots of water. The lower country was crawling with hunters and hikers, but “going deep” helped me escape the relentless pressure, bolstering my success.
Now, here I was all alone with a nice buck on the ground. The moment was satisfying for sure, but I felt a sense of urgency, too. The sun’s rays were growing stronger by the minute, and I knew the daytime temps would rise into the low 80s. I had to move quickly — butchering the buck, placing the quarters in game bags, and hiking out with a pack full of meat and antlers. Oh, boy, I thought. Fortunately, back at the truck there was a large cooler already filled with frozen water jugs. I wasted no time and began the arduous trek back to the trailhead.
When it comes to bowhunting, my favorite place to be is somewhere out West while pursuing mule deer, blacktail deer, Coues deer or elk in the high country. The beauty of the western mountains is spectacular, as are the trophies. But there is one big downside — it’s rather warm during the August and September bowhunting seasons, and such conditions can spell big trouble for meat care, unless you act fast.
Here are some proven tips and tactics to properly care for game meat in the backcountry. By employing these methods, I have no doubt you’ll end up with a freezer full of top-quality venison and fond memories from a successful hunt.
Cool It Off
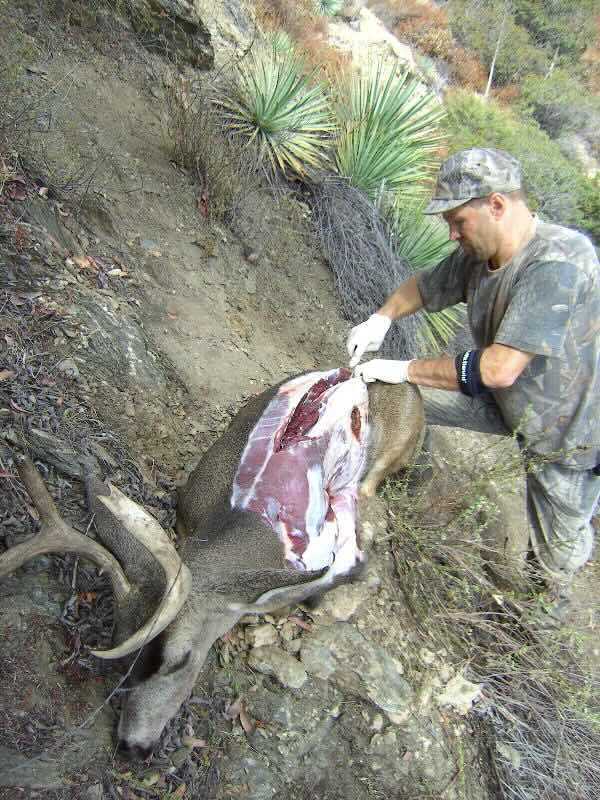
Early season game care starts by cooling the meat as quickly as possible. This is why making a good shot is important, so you can recover the animal promptly, snap a few photos, and then begin the skinning process. Animal hide serves as a protective layer, something that will lock in heat rather than letting it escape, so it’s critical to get the hide off so the meat can cool.
It’s best to drag the animal in the shade, then start skinning. In warm weather, you essentially have only a few hours before bacteria action begins to sour, or worse yet, break down and spoil the meat. If you arrow an elk and can’t move it, create shade by using a small tarp or making a lean-to out of fallen tree branches. Do whatever you must to keep the sun off the animal.
Next, skin and quarter the animal. With deer, this step is pretty straightforward. Rather than field-dressing the animal, I prefer to use the “gutless method.” This means removing the hide from one side of the animal, while cutting away the rear and hind quarters, along with the loins (backstraps) and rib and neck meat, then flipping the animal over and doing the other side. Depending on the state you’re hunting in, you might have to leave evidence of sex on one of the hindquarters, so don’t forget that! If so, be sure to use a small Ziploc baggie or latex glove to fully enclose the testicles and/or scrotum, then tie it off with a rubber band or a zip tie, so it can’t taint the rest of the meat.
With elk, skinning and removing quarters is a major chore, particularly if you’re all alone and the animal is recovered just before dark. If so, what should you do? With game meat, always remember the “40-degree rule.” Anytime the temperature is above 40 degrees Fahrenheit, and the meat is not free of hide and cooling off in the open air, then it’s at risk of spoiling, since bacteria thrives in environments above this temperature. If nighttime temperatures are below 40 degrees, the meat should be fine until you return the next morning. If not, you’ll have to skin and remove quarters all through the night!
If leaving the elk, be sure to field dress the animal, removing the paunch, intestines and all vital organs, then prop the animal up on its side so its two legs/hooves are pointing straight up at the sky. You can do this by using paracord laced around its legs to pull the animal to one side, then by tying the cord to a nearby tree. You can also try propping the elk’s legs up using a few strong tree branches. This will help position the hindquarters so they are up off the ground, preventing warm spots, which can lead to spoilage.
I’ve used this technique a number of times, while returning at first light the next day to quickly skin and remove quarters. Some of the most tender meat is found on an elk’s hindquarter, particularly the ham area, so taking additional steps to cool this portion of the hindquarter is imperative.
Quarter or Bone Out?
In the backcountry, stripping meat from the bones makes the most sense because it reduces weight by about 50% — a huge savings. But if you’re using horses or mules to haul the meat, you may want to keep the quarters intact for easier loading into saddle panniers.
When carrying meat out on my back, I let the situation dictate whether I should debone meat or not. The Utah wilderness buck I arrowed at the beginning of this article is the perfect example. My hunt was stricken with hot weather, along with lots of flies and biting insects, and the buck dropped right out in the open sage — not a tree around for potential shade. With the trailhead about five miles away, and for the most part downhill, I wanted to load up and get going, despite the added weight. If conditions were different and the deer was down in a nasty valley somewhere, I surely would’ve taken the extra time to debone the meat, cutting the weight down considerably.
With large game such as elk, stripping the meat is often the best thing to do for two reasons: the obvious weight savings and the fact that elk hindquarters are super thick and dense, making it harder to cool the meat. By deboning and cutting the meat into smaller chunks, you can improve the cooling effect.
To debone meat, use a sharp knife and fillet it off the bone carefully into large sections. Cut along the different muscle groups to separate the meat into portions that vary by quality and tenderness, so you end up with nice roasts, steaks, stew meat and odds and ends for hamburger.
Although you can debone meat while the front or hindquarter is still on the animal, I much prefer to remove it so I can lay it on a tarp, in the shade, for easy handling and cutting.

Bag It Up
As soon as the quarters or chunks of meat come off the animal, place them into a tight-knit game bag. In terms of game bags, I prefer the newer high-tech, ultra-thin, nylon fabric game bags on the market. KUIU makes some of the best I've used; they are super-lightweight and tough, ensuring years of service.
Use extra care when stripping the hide off the meat so you don’t touch the outside of the hide and then the exposed meat. If dirt and grime gets on the meat (or the game bag), it’ll jeopardize the meat’s taste, so be careful. Go slow so everything stays nice and clean, it’ll pay off bigtime at the dinner table.
Always use latex gloves when skinning animals and have extras on hand, so if you touch something bad, you can swap out the contaminated glove and continue on. Gloves also keep you safe from possible infection, since animal blood can seep through those small cuts on your hands. Also, washing and rewashing hands is impractical in the backcountry because water and soap is usually in short supply. With latex gloves, you keep the dirt, grime and blood off your hands — no muss, no fuss.
In addition to cooling the meat, you want to keep it dry as well. Warm, damp environments are perfect breeding grounds for bacteria. Do your best to wipe away any blood that’s on the meat prior to putting it in a game bag to prevent moisture from building up, especially if it’s going into a warm backpack.
Once the meat is bagged, keep it completely out of the sun. I like to place bagged meat immediately in the shade while laying it across tree branches so it can cool from all sides. After removing all quarters, I hang them under a tree until it’s time to pack out, even for multiple days, given the nighttime temperatures are cold enough.
If this isn’t the case, consider storing the meat in a cold creek during the day but be sure to rehang the meat at night so it can air-cool all over again. This will lock in additional coldness. Prior to submerging, place the bagged meat into water-tight plastic bags to avoid water saturation.
Air-drying improves the cooling effect and helps develop a crust-like film on the outside of the meat to further protect and keep it dry. By employing this technique, you can keep meat safe for several days, until it’s time to pack it out.
Meat Pack-Out
Wilderness hunts require careful planning, and the meat pack-out is one of the most critical aspects. If you’re hunting solo, be sure you’re up to getting the meat out on your own or consider hiring a horse packer to do it for you.
With my Utah buck, I harvested the deer early in the morning. I butchered it on the spot, loaded up the quarters, and hightailed it to the vehicle. I placed the meat quickly on frozen water jugs in the cooler, drove into town to get more ice, then returned a couple hours later to the trailhead. Then I hiked back up the mountain to sleep for the night and then break camp. I returned to the truck at noon the next day, ready to take on the 10-hour drive back home to Arizona. In terms of difficulty, this pack-out was pretty easy compared to some of my other wilderness jaunts.
On other trips, I found myself 10-plus miles in the backcountry, with a nice buck or bull down. When I’m that far in and hunting solo, I always secure the services of a horse packer prior to the hunt. It’s the most sensible thing to do. When I’m hunting with a good friend, we sometimes forgo the packer and haul the meat out on our own, by “dividing the load.” But again, be practical and plan wisely. It’s part of honoring the animal and making sure every ounce of meat arrives home safe and sound.
Get It On Ice
Shoving “field warmed” meat into a cramped, initially hot cooler with clumps of ice congregating in certain areas will invite warm spots and fast bacterial action! To avoid this, have your cooler already loaded with blocks of ice or frozen water jugs. I often do the latter since it’s cheaper and more convenient. Crushed ice is not as effective, as it melts faster and creates a pool of water at the bottom of the cooler.
I like to lay the meat bags on top of the frozen jugs and then buy extra bags of ice to go over the top as I’m driving home. Don’t ever store one meat bag or quarter on top of the other, unless you have layers of ice in between. If I have a long drive home, I constantly check the cooler, add more ice, and drain water to keep the inside as dry as possible. Back at home, I’ll do the same, until I’m ready to cut and wrap the meat myself or haul it off to the processor. Otherwise, meat can become waterlogged. In my experience, this doesn’t change the taste of the meat, but it does change the texture. For best results, keep the meat cold and dry.
Bowhunting the backcountry exemplifies fair-chase hunting at its finest, but once that trophy is down, make sure you’re up for the challenge! By following the tips and strategies in this article, you’ll have just what it takes to properly care for your trophy in the backcountry. In the end, you’ll come away fully satisfied, while partaking in nature’s finest protein.
Sidebar: Top-Performing Cooler
It’s important to have a cooler loaded with ice — at your truck — prior to venturing out on any backcountry hunt. This way you can get that hard-earned trophy chilled the moment you return to the vehicle, keeping it safe from spoilage. During my three-plus decades of bowhunting out West, I’ve used a wide range of coolers during those warm August and September hunting seasons, some with good to very bad results.

Last fall, I used the Canyon Prospector 125 Cooler and it exceeded my expectations in every way. During all of my hunts, it maintained ice blocks for more than a week, despite daytime temperatures exceeding 90 degrees! This cooler has some exceptional features, including front and side drain plugs, a zero-clearance lid for easy opening even with the cooler propped against a truck bed, and an ultra-durable construction backed by a lifetime warranty.
One of my favorite features is the optional basket-storage system. These baskets work great for organizing small to medium-sized perishables, in addition to separating ice from bagged or quartered meat. I like to disengage the baskets from the shelving notches and then place them directly on sections of ice or frozen water bottles, then place the meat on top. This allows air to circulate all around the meat while preventing it from getting wet and waterlogged. Overall, this is the best cooler I’ve used in terms of ease of function, durability and superior cooling performance.
It’s available in 85-, 103-, 125- and 150-quart versions, with the 125 version being my all-time favorite for storing deer and elk quarters. Check out all of its specifications at canyoncoolers.com.
Sidebar: Preserving Antlers and Capes
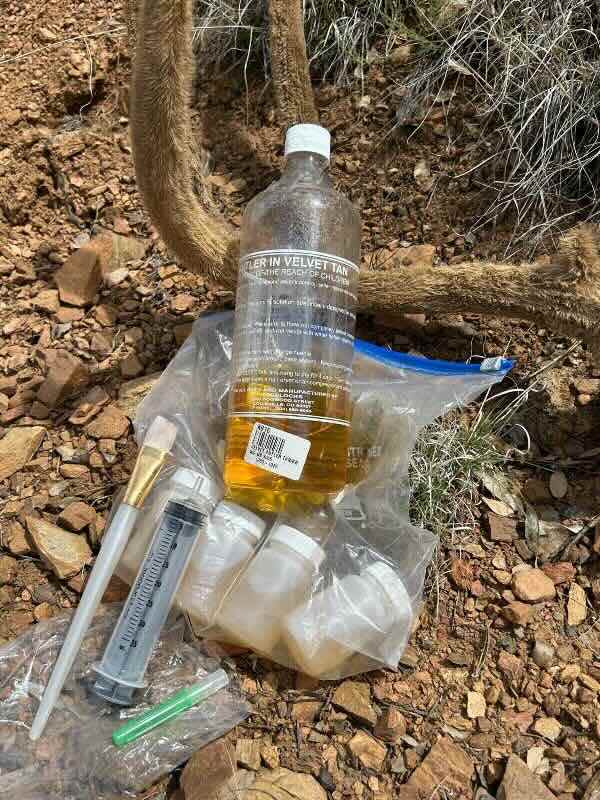
For the past 15 years, I’ve used Antler-in-Velvet Tan to preserve velvet on antlers in the backcountry. This solution is much safer to use than formaldehyde and seems to work well. Use a large syringe with needle attached to inject the solution throughout all the vein channels on the antlers. This will help pump out the blood and prevent spoilage. Also, don’t forget to wear protective gloves and goggles when applying the solution.
To begin, create a small “x” or hole on the tip of each antler tip using a sharp knife. Next, inject the solution into every vein along the antler beam. You’ll know it’s working when you visually see the velvet rise as the solution moves toward the antler tip. Keep applying solution until clear fluid comes out at each antler tip. Once this is done, use a craft-sized paint brush to liberally coat the outside of the velvet with the tanning solution. Then hang the antlers pointing downward, so gravity continues to force the solution out of each antler tip and onto the ground. Once at home, hang the antlers in the garage for several weeks to allow the velvet to fully dry. This method has worked for preserving my backcountry trophies.

If you plan on mounting your buck or bull, don’t forget to bring a good supply of salt to dry out the cape. To do this, apply salt liberally along the skinned portion of the hide. Then roll the hide and place it in a game bag. The salt will draw the moisture out, preventing hair loss and spoilage. If you don’t have salt on hand, flesh the hide the best you can, then use sticks to prop the cape open. Hang the cape at night to cool but be sure to store it in a game bag during the day. This will allow moisture to escape while keeping it safe from flies and other nasty insects.
Sidebar: Best Packs for the Job
When it comes to wilderness backpacks, there is no perfect system. Size, design and fit come down to personal preference, the number of days you’ll be hunting in the field, and the type of gear you’ll be using.
My packs of choice are made by Kifaru and Mystery Ranch. These companies put out innovative products with best-in-class comfort and durability. I’ve never had one of these packs malfunction, break or cause any type of discomfort out in the woods, something I cannot say about other manufacturers’ packs.
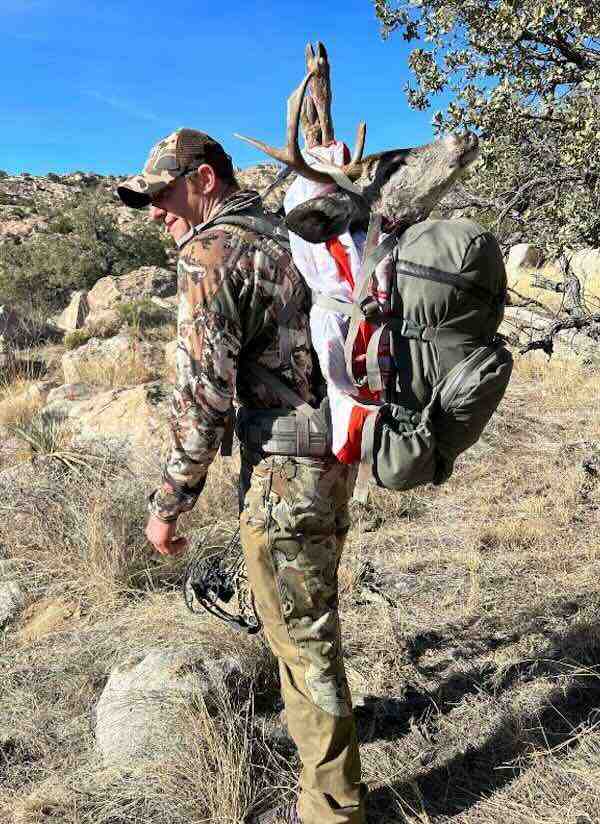
On serious day hunts or fast overnight bivy excursions I’ll use a pack that offers about 2,800 to 3,000 cubic inches of storage. Yet I prefer this pack to compress down small when “loaded light.” Once my trophy is down, I can then expand it to accommodate large meat bags and antlers. My favorite packs for this type of hunting are the Mystery Ranch Metcalf 50 and Kifaru Kutthroat. Both offer more than 3,000 cubic inches of space, a strong suspension system, and bombproof construction to support heavy loads and pack-outs, year after year.
Other great models are the Mystery Ranch Pop-Out 30 or 40, and Kifaru Stryker XL. These packs feature a unique “meat shelf” system that makes packing quarters a breeze. And when loaded up with just hunting gear for the day, they compress down tight for low-profile hiking, still-hunting and stalking.
For multi-day backpacking trips, I favor models with 5,000-plus cubic inches of storage to allow additional space for a tent, sleeping bag and pad, camping supplies, and a week’s worth of food. Mystery Ranch offers the Metcalf in larger sizes and the Kifaru Kutthroat is “expandable” by using various top lids offered by the manufacturer. I’ve used a Kifaru Timberline (now discontinued) for more than 15 years and it keeps on truckin’, a true testament to its top-notch construction and durability.