Step 1: Select The Area
 Urban deer are naturally accustomed to seeing and smelling humans and have a much different sense of required security than deer that live in a more rural setting, but it is still important for them to feel safe and comfortable. Since these plots will literally be placed in someone’s back yard, picking an area that is the farthest away from everyday activities is important in getting deer to use them. In most cases, this will be near the woods or other ungroomed areas of the property, but searching for areas secluded from activity by a small dip in the topography or other barriers, both natural and man-made, is key to increasing daylight usage. Once this region is selected, next lay out the plot where it will receive an average minimum of four hours of sunlight per day, which will allow the plants to grow even in areas where shade is present. After the plot is laid out, take a measurement to determine the amount of land to be planted.
Here are a few quick conversions to determine the acres of land to be plotted:
Square Feet to Acres: (Length in feet x Width in feet)/43,560= Number of Acres.
Square Yards to Acres: (Length in yards x Width in yards)/4,840= Number of Acres
Step 2: Measure Soil pH
The most important part of making a food plot grow successfully is measuring the pH and adding lime to the soil to increase it to the optimal level. The pH number needs to be at a “7” to maximize food plot yield. Utilizing a pH testing kit like one sold by Antler King is a quick instant test to check the soil condition. Once the pH of the soil is found, using the chart in the kit shows the amount of lime needed to raise the pH. Once the lime is added, there is no need to re-measure, as adding the required pounds/acre will raise the pH to the desired level.
Step 3: Kill Weeds And Condition
The next step is to kill off all the unwanted weeds and grasses. If weeds filter in amongst the growing plants, they will compete for nutrients and forage will not reach its full potential. Utilizing a weed and grass killer available at most hardware and garden stores is the easiest way to accomplish this quickly and effectively; it can be sprayed onto the area with a portable pump or backpack-type sprayer. You can also spray a soil conditioner onto the plot at this time to help to maximize the plot’s potential. Antler King sells a product called “Plot Max” that helps to increase organic matter and balance the pH, and it adds nutrients to the soil while helping it retain moisture. It can be sprayed on using a pump sprayer and will help to boost production as soon as the seeds are planted — it minimizes stress, especially in low rainfall conditions.
Step 4: Lime And Fertilize
After the current vegetation has been sprayed with weed/grass killer, the next step is to add the required amount of lime and fertilizer. To find the correct amount and type of fertilizer required for best growth conditions, check with the supplier of the seed you are planting, as they typically have a pre-matched fertilizer mix that has been tested to achieve best results.
Spreading the fertilizer can be accomplished easily with a broadcast spreader, but spreading lime can be a little more problematic. What type of lime to buy and how to spread it depends on the size of the plot and amount required to raise the pH. Lime is sold by the ton in a powdered form, or it can be bought in 50-lb. bags in a pelletized form. For large plots it is more economical to buy powdered lime and have it spread by the supplier, but for smaller plots, using pellets is typically the best option as they can be spread with a broadcast spreader. No matter how you accomplish this task, it is one of the most important steps to maximizing production.
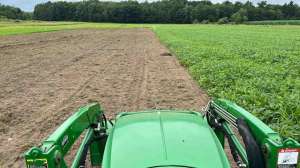
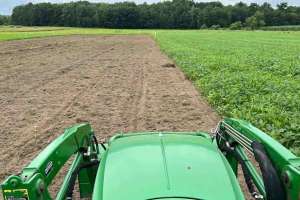
Step 5: Till
Depending on the size of the food plot and the equipment readily available, this step needs to have the most pre-planning to be done efficiently. Tilling or disking 6 inches deep should take place immediately following the spreading of fertilizer and lime, as it helps to evenly mix the nutrients into the soil. This step can accomplished using a residential garden rototiller or with a compact tractor and small rototiller attached to the rear PTO. Depending on local resources, these items can be rented or someone can be hired to till the area for you. Checking ads in the local paper for an individual that tills gardens is a good starting point to locating a capable person. For new plots, till twice, as it helps to remove large roots, rocks and clumps, and it chops the dirt finer to promote good water-to-soil and soil-to-seed contact.
If tilling isn’t viable, there are some minimum-till and no-till options available. Check with seed suppliers for instructions on how to make these types of seed work for your property.
Step 6: Plant
 Since these food plots are area-constrained, in order to prevent the food plot from being quickly decimated by a large urban deer herd, making the right choice when selecting a seed/plant is crucial. The best seed to plant is one that offers the most pounds of forage per acre. Utilizing a mixture of brassicas is a good way to produce the tonnage of forage necessary to provide an increase in nutrition subsidizing natural food sources and holding deer near the hunting property. Make two plantings per year; one in the spring that is high in protein and developed for antler growth and fawn development, and a second in late summer/fall to help keep deer in the area and provide nutrition into the winter. Planting times vary based on the region, but guidelines are typically available from the seed suppliers.
Step 7: Back Rake
After the seed has been spread, in order to maximize seed-to-soil contact, the soil needs to be back-raked over the seed. The seed should not be covered by one more than a half-inch of soil, and this can be most easily accomplished using a leaf rake. Slowly drag the rake upside down over the ground using very little pressure. This allows the seed to get embedded into the soil, creating good contact and helping to minimize the amount of seed loss to feeding birds looking for an easy meal. The key here is to use minimal pressure and kind of feel your way around to get the technique correct.
Step 8: Continual Conditioning
After the seeds have been planted and have started to grow, spraying liquid fertilizers on the resulting growth will help to keep them healthy even in high-stress weather conditions. Once the plants have sprouted and reached a height of 3 inches, fertilizing them every 30 days with a spray-on mixture will help the plants maintain ample nutrition even in times of little rainfall. If the plot is close to your home, you can also water the plants before dark occasionally just like you would a garden. Conditioning the plots after they are planted will go a long way in helping them to reach their full potential.