Living in Minnesota, I’ve learned that because our summer is relatively short, it’s important to take advantage of the warm weather. When it comes to grilling, I’ll do it year-round, but it’s certainly more comfortable during summer.
In a previous article, I detailed how to cook the perfect venison steak on a stovetop. When my family has a craving for steaks on a brutally cold Minnesota winter day, chances are good I’ll opt for frying pan vs. grill. That said, I prefer a grilled steak over a pan-fried one when given the choice. In my opinion, you just can’t beat the seared signature produced by a grill’s hot grate.
After a lifetime of grilling venison backstrap and tenderloins, I’ve developed a routine that works for me. Here are my seven steps for grilling the perfect venison steak.
1. Freeze Large Steaks
For decades I made the mistake of cutting my own steaks to 1.5 inches thick when butchering my own deer, or asking the staff at a meat market to do so. I didn’t run into problems with freezer burn because my steaks are usually eaten fairly quickly, but the smaller steaks are too easy to overcook, either on the grill or in the pan. A larger steak is easier to keep medium-rare, which is desired by my family. Also, a larger steak holds its moisture better during cooking.
2. Thaw Then Trim
By planning ahead I’m able to thaw frozen steaks in the refrigerator. About an hour before grilling time, I place the steaks on the kitchen counter to allow them to reach room temperature. In my experience, it’s easier to nail the correct medium-rare result if I start with a room temp steak. While the steaks are resting on a plate, I trim all remaining fat and silver skin. A sharp fillet knife works well. Fat adds good flavor to a beef steak, but not a venison steak.
3. Add Seasoning
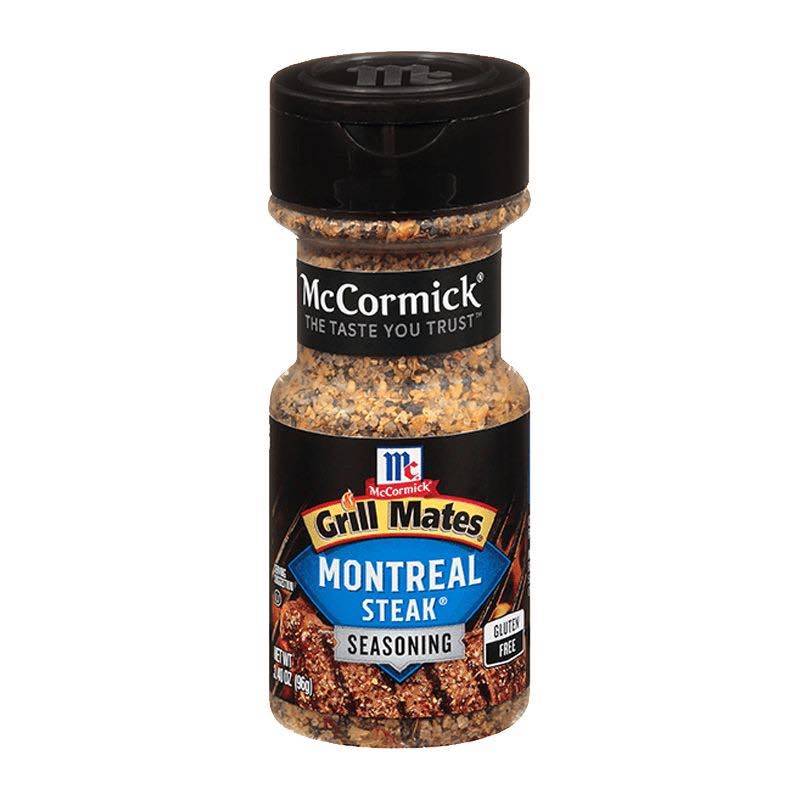
Choosing a seasoning for a venison steak is a matter of personal preference. Years ago a hunting buddy suggested McCormick Grill Mates Montreal Steak Seasoning and it’s been my favorite ever since. About 15 minutes before steaks hit the hot grill, I sprinkle a liberal amount of the seasoning to all sides of a steak. Press the seasoning bits into the meat.
Note: My backstraps and tenderloins are frozen in lengths of about 9 inches. I find it easier to cut them in half for grilling. This way I can arrange the pieces on the grill by thickness; obviously the thinner pieces will cook faster. I place the thinner pieces around the edges of the grate to slow their cooking so the thin pieces and thicker pieces reach medium-rare at the same time.
4. Fire Up the Grill
I don’t own a fancy grill. I have a run-of-the-mill medium-sized gas model from Char-Broil that works just fine. Before lighting the grill, I scrape/brush the grate, then spray it with canola oil to minimize sticking. I light the grill and then set the burners to medium-high. The grill achieves the desired hot temperature about 10 minutes.
5. Reduce Temp, Add Steaks, Watch the Clock
Depending on what else is being served with the steaks, I plan for everything to be ready to eat at the same time. Total cooking time for the steaks on my grill is 8 minutes on low- to medium-low heat. And it’s best to “rest” the steaks for 7 minutes after cooking on the grill or in the pan. So I plan for 15 minutes of total cook/rest time for the steaks.
I add the steaks to the hot grate and then reduce the heat from medium-high to low or medium-low. During summer, the low setting is my choice, but in the winter (cold in Minnesota!) I have better results with medium-low. I set the thicker backstrap pieces in the center of the grate, and the thinner tenderloin pieces closer to the edges.
After placing steaks on the grill, I immediately walk inside and set a timer on my microwave to 4 minutes.
6. Turn at 4 Minutes
After the 4-minute timer beeps, I grab a metal spatula and tongs to flip the steaks. The spatula helps reduce the amount of meat that sticks to the grate, and the tongs make it easier to rotate/flip pieces such as tenderloins that are more round in shape. After turning the steaks, I walk inside immediately and set the timer for 4 minutes.
7. Remove Steaks, Cover and Rest
While waiting for the steaks to finish cooking, I prepare other items for the meal. I also have a large enough piece of aluminum foil ready to cover a dinner plate that will hold all of the steaks. When the timer beeps again, I immediately turn off the grill, use the spatula and tongs to place the steaks on a dinner plate (stacking them is okay), then cover the plate tightly with aluminum foil.
Important: If you cut a steak immediately, almost all of the juices will rush out of it. Not good. Instead, be patient. Set a timer for 7 minutes. Don’t worry, the steaks will still be hot because they’re covered. Resting the steaks in this manner allows the juices to settle throughout the entire steak. I don’t pretend to understand the physics behind this process, but I know it to be true. Note: Cutting into a steak to check whether it’s ready to be removed from the grill also results in this juice loss. Don’t do it.
Final Thoughts
The finished steaks should have attractive seared marks on them, the Montreal Steak Seasoning provides a crusted exterior (assuming you sprinkled it on liberally), and all the pieces will be medium-rare. Of course, your results might be slightly different depending on your grill due to its burner controls. Maybe 6 minutes total grilling time is right for you, 3 minutes per side, especially if your family prefers rare vs. medium-rare. Or maybe 10 minutes is better, especially if your family prefers medium steaks instead of medium-rare. I’ve learned from experience that 8 minutes is medium-rare perfection on my grill when it’s set to low.
If your family prefers steaks with no red or pink color inside, then you’re better off with beef than venison. Overcooking venison is the quickest way to wreck it because it’s so lean. Rare or medium-rare is best in my opinion; medium can be okay, too, but be very careful not to overcook a steak.
As for condiments: One of my sons prefers to eat his venison steaks plain. The Montreal Steak Seasoning plus the natural juices are perfect for him. The rest of our family uses a small amount of ketchup. I like to add a dash of Famous Daves Steak & Burger Seasoning to my ketchup for added flavor. You don’t need much. One hunting buddy of mine is fancier and he creates a special sauce for his grilled venison (photo below). You’re the boss.

One final tip: Leftover venison steak is easy to overcook when warming it. Don’t put a steak in the microwave and hit 1 minute on the high setting and walk away. The result will be a dried out piece of meat. My favorite way to eat leftover steak is to cut it into smaller pieces and then eat it in a soft taco with sour cream, lettuce and shredded Colby Jack cheese. I heat the venison for 20 seconds on high in the microwave and then immediately place it on the shredded cheese to build the taco. Add a bit of taco sauce, too. Delicious!