Featured image: The author is a true believer in using scanning lights over thermal or night vision.
I accompanied a buddy on a nighttime predator hunt last season. Nothing unusual there. What was different was that he was using state-of-the-art thermal scanning and shooting optics. As we drove between stands, we discussed the use of thermal vs. traditional red LED lights. He made one statement that really struck home with me: “There’s nothing wrong with using lights. It’s an art form, really,” he stated.
As a longtime user of red lights, for both scanning and shooting, I reflected on his comment and realized that, indeed, the use of lights is truly a unique skill within our sport. Furthermore, scanning with LED lights is a vital component of night hunting that is often taken for granted.
Let’s take an in-depth look at the art of light scanning.
How to scan
Once a hunter has made his choice and purchased a light system, it is be time to try it afield. This is where many newbie hunters have many questions. While there is a lot that goes into proper scanning and shooting techniques, hunters need not worry. With field experience, the techniques will quickly become second nature.
Each hunter will, no doubt, adopt their own style of scanning — a style that he or she feels most confidently in using. The information provided in this text is drawn from my personal experience from over 32 years of night hunting, as well as input from two well-known members of the hunting community, Brian Trussell and Jeff Thomason.
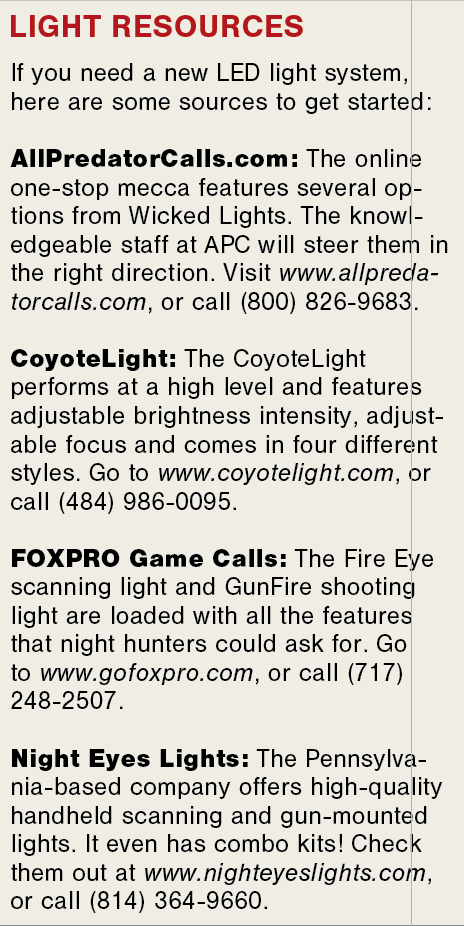
If you want to get into light scanning, here are four companies that make high-quality lights.
A common question among aspiring night hunters is, “Do you scan the entire time while on stand?” I’ll make this simple: Yes! My motto is that if your light is off, you are just a guy sitting in the dark! Unless it is one of those rare nights that features a blanket of snow and a bright moon, which allows you to see the predators as if it is daylight, you had better have your light on. You never know when a predator is going to show up, so constant scanning is paramount for success. In fact, hunters should be using their scanning lights even before the calling session starts. Pre-scan fields as you make your way to your calling destination. Many times, fox and coyotes will already be in the fields and, when detected with your lights, will still be susceptible to calling efforts.
The rate of scanning speed is another important factor to consider. What I mean is “how fast do you move your light beam across the terrain?” The answer to this is going to be drawn from a combination of personal preference and knowledge of predator behavior. We know that both coyotes and fox can appear at any time. For this reason, it stands that hunters should illuminate their surroundings as frequently as possible. However, not so much that the erratic light beam can be alarming to incoming predators. I like to move the beam across the terrain in a smooth motion and steady, medium pace. Rapid, jerky motions with the light beam can have negative effects on responding predators. I tend to scan the farthest areas first, from left to right, and draw the light beam toward myself with every ensuing sweep.
FOXPRO Field Staffer Brian Trussell alters his scanning speed according to the type of terrain he is hunting. “In heavier timber, or brush country, where you can’t see as far, you need to move the light faster because when predators step out to investigate the sound they are always closer to the hunter. In open country, you can see them approaching farther away so fast scanning is not as important as being in a tighter area,” Trussell said.
Jeff Thomason, Host of Predator Pursuit TV, also shared his viewpoint on the subject of scanning speed: “I think this is one of the biggest mistakes you can make when starting out night hunting,” he said. “I remember moving my light very slow. I was afraid I was going to miss something. Nowadays, I scan just about as fast as possible. This gives an animal less time to bust you. The sooner the light is in their eyes, the better. If you go too slow, it gives them a chance to show up, see you and leave without you even knowing they were there. Don’t be afraid you are going to miss something. When you hit an eye, you will know it!”
The brightness of the light beam is also an important factor to consider. Many of the higher-end scanning lights feature adjustable beam intensity. So, the next question is “How bright should my scanning light be?” A safe answer would be “bright enough to detect eyes without spooking the predator.” Of course, the answer will depend upon each individual brand of light. Hunters should experiment and see how predators react to their specific lights. When using my FOXPRO Fire Eye, I typically use 50 to 70 percent of maximum intensity. This allows me to detect eyes for at least 500 yards. Trussell, when initially scanning, uses low intensity. “Just enough to see the eyes and not spook the animal” he said. He increases the intensity as the predator approaches. Once fully committed, Trussell uses high intensity as the predator continues its approach.
What to do when you see eyes

When you finally see eyes, do you know how to intensify the light without scaring away the critter?
Let’s assume you have done your scouting homework and are now scanning your favorite field on a beautiful night. Rabbit distress echoes across the field as you scan diligently. The next thing you know … eyes! It’s that magical moment when you realize that all your hard work (and financial investment) has paid off. You don’t want to blow the hunt now. So, how do you work the light to make sure the predator continues its trek to your setup? A great tactic is to aim the center of your light beam above the predator so its eyes reflect in the bottom portion of the beam. This is referred to as keeping the predator “in the halo.” This actually serves two purposes. One is that it keeps the most intense portion of the light out of the predator’s eyes and reduces the likelihood of spooking the critter. Secondly, with the majority of light beam cast above the predator, the surroundings in front of the predator will not be illuminated, which helps to maintain a more natural scenario.
Trussell also relies on the halo technique. He also increases light intensity while monitoring the predators approach. He explains that “once the animal is committed to the call, I increase the light intensity so the shooter has a good shot opportunity.”
The Light Transition
Transitions from a hand light to rifle-mounted light is one of the toughest parts of scanning. Fortunately, the author offers several tips to avoid any blunders.
One of the greatest challenges for night hunters is making the transition from scanning light to shooting light. Shotgun enthusiasts, who often rely on LED head lamps, do not suffer this conundrum. They simply keep the predator in the halo until it is time for the shot and aim the beam to their liking when they take the shot. Rifle hunters, when accompanied by a partner, are also spared the tough transition. In that scenario, the designated “light guy” can handle all spotlighting duties and leave the shooting to the other partner. Solo rifle shooters, on the other hand, have a major decision to make. When do you shut off the scanning light and turn on the shooting light? Jeff Thomason gets the shooting light on an animal as soon as possible. He says his early transition “allows me to identify an animal much quicker by using my scope.”
The transition of lights can cause wary predators to grow quickly suspicious and halt their approach. To lessen the frequency of this happening, there are some tricks to employ. One is to transition when the predator moves behind a knoll, hedgerow, tree or some other landscape feature that masks the switching of lights. Another is to turn the shooting light on before turning off the scanning light. Aim the shooting light in the direction of the predator, but not necessarily directly at it. Being inundated with both lights simultaneously may prove to be too much of a good thing. Once both lights are on, turn off the scanning light and locate the predator in your scope and continue to monitor the predator as it approaches. As before, keep the predator in the bottom edge of the halo until it is time for the shot.
FOXPRO has made this difficult transition easier with its smart light technology. Its new series of lights have the ability to “communicate” with each other, so when one light gets turned off, another instantly turns on. For example, while scanning with a handheld light and an animal is seen, the hunter turns off the scanning light and the shooting light automatically turns on. With only one press of a button, the transition is made — smooth and easy!
Taking The Shot
Let’s assume you have made a smooth light transition and are now watching the fox or coyote through your rifle scope. I still keep the predator in the bottom of the halo as I look through the scope. Trussell agrees, adding, “I start increasing light intensity but never drop the beam directly in his eyes until I, or my shooter, am ready to make the shot.”
Through past nationwide surveys that I have conducted the subject, the average nighttime shot distance is 75 to 100 yards. Many hunters feel confident taking ethical shots at these distances. After positive identification, the hunter can now prepare for the shot by centering the beam for maximum illumination of the target. At this point, the predator will be fully committed and the entire body will be illuminated for a manageable shot. Taking a successful nighttime shot will be the culmination of a concentrated effort in the art of light scanning.