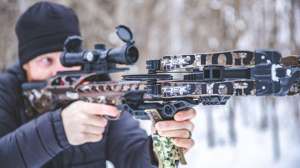
Shooting confidence is a unique phenomenon — it’s not produced by following a simple formula or scientific procedure. Instead, it’s acquired internally, by what we see and feel over time. In other words, confidence can’t be forced; it must happen naturally. When you have confidence, you know that you can perform flawlessly when the moment of truth arrives.
The best way I know how to achieve confidence in archery is to enjoy the shooting process while using a well-tuned and accurate bow. This shooting “enjoyment” should be experienced day after day, week after week, and month after month, until confidence overshadows everything. For bowhunting purposes, the bow must shoot precisely using broadhead-tipped arrows — no exceptions.
However, many bowhunters run into problems at this juncture. They set up a bow, get the draw weight and length set just right, and then start punching the daylight out of the bull’s-eyes. Shooting confidence reigns supremely. That is, until they begin shooting broadheads, which tend to impact differently compared to field points. Sometimes the point-of-impact difference is minor, while other times it’s substantial. This can happen with mechanical broadheads, too, especially when shooting downrange from 40 to 60 yards.
In hopes of correcting the problem, archers begin fiddling with the arrow rest and the arrow’s nock height, attempting to get broadheads to strike with field points. This can work, but more times than not these adjustments make the issue even worse, causing anxiety and anger — a real confidence downer.
To avoid this nightmare, consider this step-by-step process for dialing in your bow’s tune. Some of these steps require extra work and time on the range. But once it’s all completed, you’ll enjoy consistent broadhead flight, giving you the confidence you’ll need on your next hunt.

Adjusting the Bow
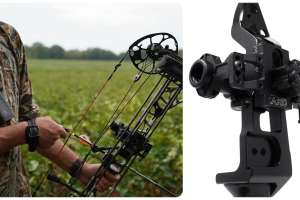
Today’s compound bows produce extreme arrow speed, which translates into flat-shooting trajectories and high kinetic energy — two factors that can help you bag more game. This is great, but with all that energy stored in the limbs and string harnesses, things can go awry pretty quickly, particularly if the bow’s cam system is not operating correctly. Ideally, the cams should roll-over at exactly the same time, creating unison and smoothness. This helps the bowstring surge forward with as little oscillation as possible, producing smooth and level arrow take-off.
However, if the bow’s cams are not in sync — and not aligned vertically with the bowstring — then the bowstring won’t follow a smooth, straight course. Instead, it will whip from side to side, causing excessive string vibration and poor arrow flight. Most tuning problems occur because of this issue. Fortunately, this can be fixed pretty easily. All you need is a bow press, some help from a friend, and a little archery know-how that involves twisting up the cams’ string cables, which is pretty simple.
To begin, draw the bow back while pointing it in a safe direction, then have your friend observe each cam’s roll-over position. While at full draw, ease in and out of the draw valley, so your friend can observe which cam is rotating slightly ahead of the other. Remember, you want both cams striking each draw-stop at exactly the same time.
To make this step easier and more precise, I suggest using a bow-drawing device, such as Last Chance Archery’s Draw Board. With this tool, you can crank the bow back very slowly while you check for proper cam position.
Once you’ve identified the cam-synch problem, place the bow in the press and relax the strings. For the cam that strikes ahead of the other, add one full twist to the cam’s string cable, then recheck the cam’s positioning. Keep adding twists, including 1/2-turns, until both cams come into rotational sync. Remember, the more precise you can be with this step, the more accurate the bow will shoot, especially with broadheads.
After the cam system is dialed in, you can move to the next part — adjusting the bow’s fit to your body. This is a critical phase of the tuning process, as consistency is a byproduct of shooting comfort. To micro-adjust your draw length in 1/4- to 1/8-inch increments, you can shorten or lengthen your D-loop, or twist or untwist the bowstring until things feel just right.
As far as draw weight goes, don’t overdo it. If you have to lift the bow drastically to the sky to get to full draw, you’re shooting too much weight! Always err on the side of less bow weight rather than more. Being cold and tired is a normal part of bowhunting. A light-drawing setup can provide the stealth and smoothness you need to get to full draw undetected, while making that lethal shot.
Finding Center-Shot
Aligning the arrow with the center or “power path” of the bowstring is vital for top shooting performance. There are two ways to find the correct center-shot position. You can reference your bow’s user manual, or you can do it the old-fashioned way: by visually aligning the bowstring with the cams’ string grooves, then drawing an imaginary line on the arrow shelf. Then place the arrow on the bowstring and adjust the arrow rest left or right until the arrow shaft bisects this line perfectly. That’s the bow’s correct center-shot.
In most cases, the center shot will be 5/8 to 1 inch out from the threaded hole in the bow riser to the centerline of the arrow shaft. Once center-shot is set, adjust the arrow’s nock height to about 90 degrees, or 1/16 inch above square. You can use a T-square to acquire the correct nock or D-loop position. Or, you can use a simple business card braced against the bowstring and arrow shaft, which forms a right angle. Then move the arrow shaft so it’s flush with the corner of this angle. This will place the nock at exactly 90-degrees to the bowstring — a good position to start your tuning.
Improving Nock Fit
A lot of bowhunters ignore overly tight or loose nock fit. But if not addressed, it can be problematic to accuracy and arrow tuning. The arrow nock should clip onto the bowstring positively but with light resistance.
To evaluate nock fit, attach the arrow (or just the nock) onto the bow’s center serving and rotate it around 360 degrees. If the bowstring twists along with the arrow or nock, then it’s too tight. If the nock’s throat appears overly large for the diameter of the bowstring — and it can move easily from side to side and up and down the bowstring — then it’s too loose.
There are two ways to fix poor nock fit. You can re-serve the bowstring with smaller or larger center serving thread, so the thickness of the bowstring better suits the throat size of your arrows’ nocks — a pretty extensive chore. Or you can try different nocks until you find the perfect fit. I prefer the latter because nocks are relatively cheap and easy to swap out, giving you the option to try different brands and throat sizes until the arrow clips on the bowstring just right.
For example, Bohning’s Signature Nocks have a throat size of .109 inch (or 2.77mm), whereas the company’s Blazer Nock has a larger throat size of .120 inch (or 3.05mm). Both nocks fit standard-size carbon arrows, so it’s easy to swap and experiment.
“Nock pinch” is an entirely different issue and it can degrade accuracy as well. This issue will haunt archers with long draw lengths and who use short axle-to-axle bows.
An easy way to check for nock pinch is to remove the field tip from the arrow, then draw the bow back using the arrow. If the arrow lifts off the arrow rest, then the nock is being pinched. To solve the problem, tie in a small threaded nockset inside the D-loop, just below where the nock snaps onto the bowstring. This will create downward pressure as the bow is drawn across the arrow shaft to the rest, alleviating that pinching force caused by the sharp angle of the bowstring at full draw. This simple step will improve arrow flight, shooting forgiveness, and accuracy. I use small-diameter thread for tying in nocksets. My favorite is BCY’s 3D end-serving thread, which is .016 inch thick.
Bringing It Together
Now that the bow, arrows and nock height are all set, you can begin shooting through taut paper to evaluate arrow flight with field points. For this step, all you need is a roll of painter’s paper, a simple cardboard box or sheet of plywood with a large hole in it, and some clamps, tape or staples to hold the paper tightly in place.
Next, place the paper rack about 3 to 4 feet in front of a large target butt, so the arrow has plenty of room to exit the paper before impacting the backstop. Stand 6 feet from the paper rack, then fire an arrow through the center of the rack. Be sure to stay relaxed and use good shooting form. Examine the tear in the paper. The goal is to achieve a clean “bullet hole” tear, with only the footprint of the shaft and vanes and nothing else.
I actually start paper-tuning with an un-fletched arrow. I wrap about 3 inches of electrical tape where the vanes usually attach, so the shaft weighs and balances the same as a fletched arrow. There are two reasons I do this: the bare shaft eliminates the chance of vane contact while also creating the smallest possible tear in the paper, adding precision to my tuning work.
When paper tuning, attempt to tune out vertical tears first. For a tail-high tear, lower the D-loop slightly on the bowstring or move the arrow rest up. For a tail-low tear, raise the D-loop slightly or move the arrow rest down (but not too much — vanes need to clear the arrow shelf). For a tail-left tear, move the arrow rest to the right. For a tail-right tear, move the arrow rest to the left. Make small 1/16- to 1/32-inch adjustments at a time.
Once you achieve a clean tear in the paper using the unfletched shaft, verify the flight pattern using a fletched arrow. It should be exactly the same, other than the small slits in the paper caused by the vanes.
If you get a ragged tear, then you’ll know vane contact is the culprit. Spray the arrow’s fletching with aerosol foot powder, then shoot the arrow into a firm backstop, then look to see where the vane contact is occurring. To eliminate the vane contact, try rotating the arrow’s nock slightly left or right. This can sometimes work like magic, preventing the vane from colliding with the arrow rest or string cables. If this doesn’t work, then you’ll need to switch to lower-profile vanes. For example, if you’re using Bohning’s Blazer vanes (.53 inch tall), then you may need to switch to Bohning’s Atlas (.45 inch) or Heat (.41 inch) vanes instead — two great options to consider.

Tuning Out Large Tears
Despite precise cam synchronization, the bow’s cam system may still exhibit excessive amounts of bowstring oscillation, preventing good arrow flight. To solve this problem, and to rid yourself of those gaping tears in the paper that just won’t go away — despite constant arrow rest and nock-height tweaking — you’ll have to start adjusting the bow’s string yokes, which are attached to the outer limb tips. By adding twists to one side of the yoke, while untwisting the other side in equal amounts, you can adjust the load so the cam’s vertical alignment is more in line with the path of the bowstring.
Most bows are equipped with one string yoke, while others have two. And some bows don’t have string yokes at all! If this is the case, you’ll need to attempt to “shim” one or both cams along the axle, by moving spacers until the bad tear is eliminated (see the adjacent sidebar for step-by-step information). But, if your bow has a string yoke, you should start here.
Begin by adjusting the top-limb yoke by making one or two twists to one side of the yoke, then continue to paper tune. Again, be sure you twist one side and untwist the other side in equal turns, which will maintain the bow’s draw length and cam-synch settings. A bow press is needed for yoke tuning, since you must relax the limbs to twist/untwist the string ends.
If the issue is a large left tear, then twist the left side of the string yoke and untwist the right side. If it’s a large right tear, twist the right side of the yoke and untwist the left. After each adjustment, you should draw the bow back a couple times so the twists unravel and settle in.
Once this is completed, continue paper tuning. Keep in mind, you might need to repeat this procedure a couple more times to get rid of a large tear. But don’t give up — it usually works like a charm. If your bow has a bottom string yoke, feel free to adjust this one too, but only if it’s needed. In most cases, adjusting the top yoke is significant enough for correcting troublesome arrow flight.
Shooting Downrange
Now that your arrows are cutting clean slits through the paper, you can enhance the tune further, so broadheads impact right with your field points. To do this, outfit three arrows with broadheads and three with field points. Be sure to spin each arrow on its nose, or across arrow rollers, to ensure every one rotates wobble-free from point to nock.
Next, shoot all six arrows into a 30-yard foam target. Make sure it’s a calm day with no wind. Compare the arrows’ group sizes and impact points. If paper tuning was done correctly, the broadhead group should be about the same size as the field point group.
Impact points may differ slightly, however. To bring the groups together, try moving the arrow rest in small increments (1/64 or 1/32 inch). If broadheads impacted to the right of the field points, move the arrow rest to the right. If they impacted left, move the arrow rest to the left. If they impacted high, move the arrow rest down slightly. If they impacted low, move the arrow rest up slightly. Do this until both groups merge together.
You can also complete this step at further distances, such as 40 or 50 yards. If your arrow rest adjustments don’t seem to shift impact points much, you can combine group-tuning with yoke-tuning until you achieve the results you’re looking for.
For example, if broadheads group to the right of the field points, make a twist to the left side of the yoke and untwist to the right. If they group to the left of the field points, twist the right side of the yoke and untwist the left. Continue to do this until the arrow groups strike the same spot.
By group-tuning, you can usually get your field points and broadheads to impact nearly the same. However, when shooting at longer distances, the aerodynamic shape and slightly different front-of-center weight of a broadhead will prevent it from shooting just like a field point. As hunting season approaches, it’s wise to practice with broadheads only, or use special “practice heads” that mimic the shape and weight of your fixed-blade or mechanical broadheads. This will ensure dead-on accuracy, so you feel more confident and ready for opening day.
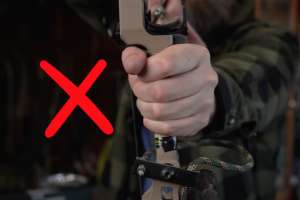
Sidebar: Stay Relaxed!
When paper tuning, be sure to use proper shooting form. One common ailment is shooting with a tense bow hand. This tends to torque the bow’s handle and arrowrest as the arrow cycles through the bow, causing arrow flight issues. The key is to stay relaxed and focused while delivering a smooth shot. This will prevent irregular paper tears and faster arrow tuning.
Sidebar: Cam-Tuning: How It Works
Cam tuning or “cam shimming” isn’t as complicated as it sounds. It’s pretty simple, actually, since all you’re doing is decreasing/increasing spacer thickness from one side of the cam to the other, so you can move its position along the axle. By moving the cam, you can adjust it so it’s more in line with the bowstring — all to improve arrow flight.
You’ll need a sturdy bow press to perform this task. I prefer Last Chance Archery’s EZ Press. It allows fast, effective pressing and un-pressing, without putting tension on the bow’s riser.
When paper tuning, if the arrow consistently tears tail-left, then move the cam to the left. If it tears tail-right, then move the cam to the right. If moving one cam doesn’t eliminate the bad tear, try moving the second cam as well.
Some bows come standard with interchangeable-axle spacers, making it easy to swap one for the other until the cam is aligned perfectly. For bows that don’t have this feature, you’ll have to purchase a spacer kit from Lancaster Archery Supply or Last Chance Archery. Both suppliers offer affordable kits. You can also try contacting your bow’s manufacturer and requesting an assortment of spacers that are tailor-made for your setup.
Photos by Joe Bell