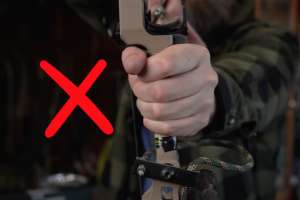
There’s nothing better than field testing products. I love it. I love being able to spend large amounts of time with a given product and report my findings back to you. My hope: You will use this in-depth field test to make an informed buying decision when it comes time to add a new single-pin member to your sight family.
This second batch of fancy-to-do 2015 single-pins proved as durable, bright and efficient as the first. (Part I can be found here.) Once again, I dug deep into each sight and explored each and every feature/detail to the fullest. So grab a cup of coffee, kick your feet up and take a gander at the following single-pin offerings. Chances are you’ll find one that’s right for your riser. Enjoy!
Trophy Ridge React One Pro
 The Trophy Ridge React Series has been the pot of gold many archers have been searching for, and the new-for-2016 React One Pro only sweetens the pot. From the get-go, it was clear the new Pro was smaller, lighter and more compact than its predecessor. The fiber optics are wrapped in a visible figure-eight pattern and concealed in a thick, clear plastic rectangular box that attaches to the body via two set screws. Initial impression: I like the protection. Other features that jumped out were the new four-knob adjustment that allows the shooter to quickly and easily adjust the sight along the dovetail. A simple counter-clockwise turn loosens the knob and activates the slide, and a clockwise turn locks it firmly in place. I love simple and quick adjustability. In addition, I liked the React One Pro’s totally tool-less windage and elevation adjustments via a pair of silver-colored stainless-steel posts. I found the posts very easy to manipulate, and should you need to move the posts, both unscrew and can be reset in a number of pre-drilled holes.
After mounting my sight and making sure my slide was all the way up to ensure maximum range adjustment, I fired a few arrows and set my 20-yard pin. I appreciated being able to leave my needle at the top of the slide and only adjust my elevation by moving my housing with the tool-less elevation adjustment. It took me no time at all to have the sight dialed-in at 20 yards. After robin-hooding my last arrow at 20 yards, I let React Technology take over. I sighted-in at 30 yards and was dead-on accurate out to 100 yards after that. Amazing.
Unlike the original React One, the new model doesn’t have rear-facing sight indicators. I was glad. I wasn’t a fan of what seemed to be fiberglass-type colored line inserts. The new Pro boasts nine illuminated dots (my model followed a green, green, red pattern) on the left-hand side of the sight body. On the right-hand side of the body is an indicator needle and room for a separate sight tape.
The housing seemed durable and brightness wasn’t a concern. My glowing .019 fiber-optic pin stood tall in the housing, rising above the leveling bubble. The sight also offers second- and third-axis adjustability.
Apex Gear Covert
I like to see innovation and truly helpful ideas come to life, and that’s exactly what I found in Apex’s Covert. By loosening the pin-lock screw located on the front side of the vertical pin standing tall in the housing (included Allen wrench needed), you can 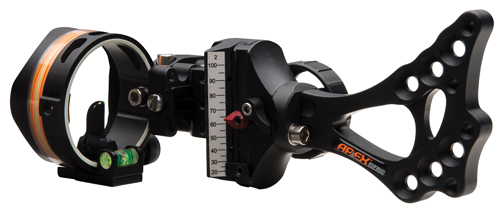 actually access three different pin colors. Turn the set screw counter-clockwise – three or four turns are necessary – and the pin is ready to slide backward. Use your thumb and apply a minute amount of pressure, not directly on the pin post but on the block the pin is attached to, and push back. You will hear a “click,” and the fiber optic will change from green to red. Another push back and the fiber optic in the pin becomes orange. Once you find the color that is right for you, retighten the set screw.
Like the Range Rover, the Covert’s bubble is housed in a bracket located just below the sight housing and is, at least with my anchor points, easy to see at full draw. The pin, regardless of setting, is plenty bright, and the glow-in-the-dark shooter’s ring proved very beneficial in low light.
The Covert provides multiple mounting holes and is quiver-friendly. I was pleased with the overall smoothness of the yardage-adjustment knob. I didn’t detect any clicks or sticks, and I appreciated the knob’s small, raised grippers that made handling super easy. Also a real hat-tipper was the fact that with a simple turn of a few set screws, the sight housing can be rotated from front to back, left or right, and up and down.
The Covert doesn’t have windage and elevation marks, but I found that to be a very minimal concern when sighting-in. To adjust windage, use the included Allen wrench and turn the silver stainless-steel set screw located atop where the sight attaches to the sight body. Use the windage gang-adjustment screw to move the sight in or out. After setting my windage, I tackled elevation. Turning the yardage-adjustment knob all the way to the bottom of the rail, I started the process of trial and error. At first glance it doesn’t appear that the Covert allows for elevation adjustment outside of the yardage-adjustment knob, but upon closer inspection you will notice two small set screws located on the outside of the sight where it attaches to the sight body rail. Loosen these screws with an Allen wrench to get your 20-yard setting dialed in.
It took me exactly 15 minutes to have my Covert dialed and set at 20 yards. After getting zeroed-in at 20, I made a mark and backed up to 60. Using the attached pre-marked yardage tape, I made my marks. Then I peeled the tape off and matched it up with one of the many included yardage tapes.
TruGlo Archer’s Choice Range Rover
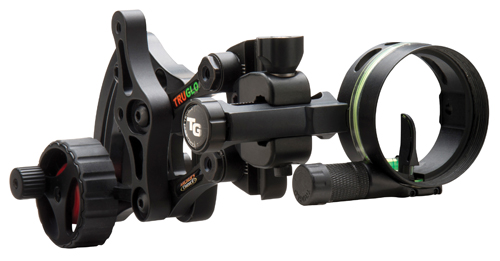 One of the very first sights I ever used was a standard five-pin TruGlo. The sight was tough, accurate, quiet and bright. I’m happy to report those qualities don’t seem to have gone by the wayside. Better yet, the assembled-in-the-package single-pin Archer’s Choice Range Rover features plenty of new technologies sure to appeal to the single-pin crowd.
The single .019-inch pin stands very tall in the housing – a housing featuring a glow-in-the-dark shooter’s ring – and the leveling bubble is attached securely in a bubble bracket anchored to the bottom of the housing. Personally, I like this design. Some leveling bubbles – those that are glued in to the housing – wiggle loose over time and pop out. The pin proved to be exceptionally bright. Plus, the sight comes with an attached rheostat light with on/off indicator marks.
Adjusting windage was a breeze via the wing-nut-shaped tool-less windage adjustment and laser-engraved adjustment marks. Much appreciated was the fact that once precise windage was achieved, I could use an Allen wrench to snug the windage knob down ultra-tight. As for elevation, I loosened the yardage-lock screw attached to the super-smooth Zero-In Adjustment Dial and rotated the dial counter-clockwise until the sight bottomed out. Doing so guarantees full range of the Rover’s yardage dial. Next, I loosened a pair of 9-64 set screws that attach the sight to the sight body and used the laser-engraved reference marks. This takes some trial and error, but it took me less than 10 minutes to have the sight zeroed in at 20 yards.
The sight comes with a pre-attached sight tape, which makes the sight-in process super easy. After getting my 20-yard mark dialed, I again used trial and error to sight-in at a distance of 60 yards. Using an ink pen, I made lines for my 20- and 60-yard marks and carefully peeled the attached sight tape off. I then matched the marked sight tape with one of the 84 pre-marked tapes, cleaned my sight rail with an alcohol pad and attached my new tape. It was dead-on accurate out to a distance of 100 yards.
Other appreciated features included the adjustable quiver-mounting plate and protected extra-long fiber which coils around the housing. If I had to be a bit picky, I would like to see a more secure sight-housing-to-windage-rail attachment. The single set screw is somewhat difficult to access, and I noticed after about 100 arrows, the sight began to produce a very low buzz, which seemed to originate at this attachment point.
Copper John Mark IV
I knew I was going to be a fan of the Copper John Mark IV the second I popped open the package. How? Simple. Durability. I  love a sight that looks and feels like a tank. This sight reminds me of a steroid-injected body builder.
Testing the sight only confirmed my overall happiness with it. After attaching the sight to my riser via a pair of set screws, I went right to work. The pin stands tall in the bulletproof housing, and the leveling bubble is easily spied at full draw. I love that feature in any sight. I also was a big fan of the wide, recessed-into-the-housing orange shooter’s ring. This orange color, at least for me, married perfectly with the ultra-bright fluorescent-green fiber-optic pin.
Because I was so comfortable with the sight, I shot it well from the get-go. Confidence is a big part of bowhunting. Loosening the branded (Lock/Unlock) adjustment arm dial – which I found to be relatively smooth (a few bumps and humps) – I lowered the arm to the bottom of the slide, thus raising the sight. Wanting to maximize my glow-in-the-dark shooter’s tape, I loosened the single elevation set screw on the front side of the sight adjacent the pin. Doing so allows the sight to slide up or down easily, and I appreciated the trio of white elevation arrow markers. After getting my 20-yard elevation dialed, I moved on to setting my windage. To adjust windage, simply loosen a single set screw atop where the sight attaches to the sight body. Laser-engraved marks make the process easy, as do a pair of white windage arrows. I wrote down in a notebook the position of my white windage/elevation arrows in correlation to the laser-engraved reference marks. This is a great thing to get in the habit of and will save headaches if you ever move your sight.
Once I had my windage and elevation dialed, I was able to sight the Mark IV to a distance of 80 yards. Other sure-to-be-cheered features of this sight included an easy-to-set-up third axis, which is clearly labeled atop the sight housing. The sight also features second-axis adjustment, wrapped fibers and an included rheostat light.
I know I’ve already alluded to the sight’s overall durability, but I need to elaborate a bit further. The sight boasts a unique bearing system, which features steel springs that sit underneath each bearing surface. These springs are designed to expand to keep all bearing surfaces fully engaged and keep the unit tight and smooth. This feature, married with the sight’s all-steel construction, allows it to take season after season of rugged abuse.
Trophy Taker Option 6
Dan Evans’ latest marvel, the Option 6, is by no means a standalone single-pin. Rather, the heavy-duty Option gives 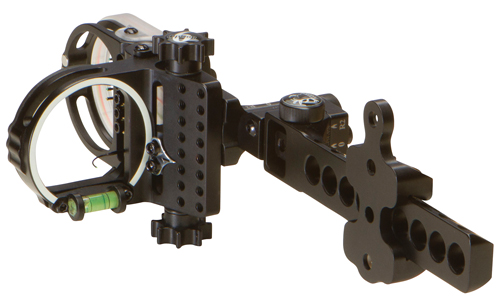 bowhunters the choice between six fixed pins (more on those in an upcoming issue) and one slider. It can, however, be shot solely as a single-pin, and after spending several days with the sight attached to my riser in single-pin mode, I can testify it meets and exceeds the hype surrounding it.
The Option 6 came assembled in the package, and its dovetail design allows the shooter to adjust the sight toward or away from the riser. After attaching the sight via a longer pair of set screws (screws are longer to accommodate the included quiver bracket), simply loosen a pair of set screws in the dovetail attachment to slide the sight in or out.
After locking down my dovetail bar, I swung open the fixed-pin housing, leaving only the single, horizontal set pin. This feature is amazing. A pair of ultra-heavy-duty magnets located in the fixed-pin housing butt up to another pair of magnets laid into the sight. The housing swings away like butter, and the magnets, once they grab hold, don’t let go. There is zero slop with this sight with the magnet-to-magnet connection. After exposing my single pin I eyeballed the pin’s positon in the housing and used the micro-adjust knob for windage gang adjustment, located where the sight attaches to the sight body, loosened a single set screw and started making adjustments. The laser-engraved windage rail is numbered, starting with 0 in the middle and then running from 0 to 30 to the left and right. Should you need to make a significant windage adjustment, you can remove the sight from the sight body and choose from one of three (0, R1 or R2) windage-adjustment holes.
Once my windage was set, I adjusted the slider pin as far up in the housing as possible using the ultra-smooth drive knob. The eight-pronged drive knob protrudes from the sight at the top and bottom. Note: Tension adjustment for the mover pin can be done in one of two ways. First, you can loosen the set screw on one of the adjustment knobs (top or bottom), then squeeze them toward each other with more or less tension. Or you can loosen the two set screws and push with either more or less force on the mover pin fiber guard. After sliding my pin to the top to maximize travel range, I adjusted the micro-adjust knob for elevation located on the sight body. If major elevation adjustment is needed, simply remove the set screw and, as with the windage adjust, choose from a 0, R1 or R2 setting. Once you have the right setting, use the micro-adjust knob to make minute up or down elevation changes.
Once my slider pin was set at 20 yards, I moved back to 50 yards and shot group after group until I was confident in my grouping. Next, I peeled the correct Trophy Taker tape – included and marked out to 100 yards – and was set to go. Overall, I was completely pleased with this new wonder from Trophy Taker. The single horizontal pin was plenty bright and has its own fiber-optic housing located on the sight in-between the eight-pronged drive knobs. I had no issues with the sight’s brightness in any lighting condition. My only concern – and it’s a small one – is the fact that even after tightening and retightening every set screw, I still got a bit of vibration and buzz at the shot.
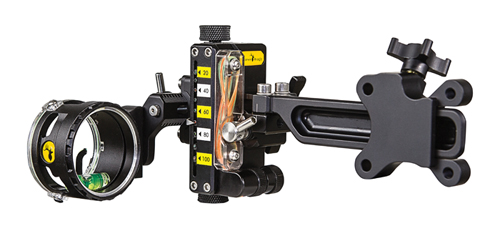
Axcel AccuTouch CarΒon Pro
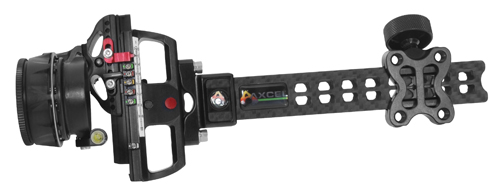 The second I removed the assembled Axcel AccuTouch Carbon Pro from its packaging, I got chills. The sight definitely has a “Wow!” factor that can’t be ignored. The sight is easy on the eyes and I really appreciated its ultra-light nature. The carbon dovetail is impressive.
Mounting the sight to the bow requires the installation of an included sight bracket to the bow’s riser but takes only a few seconds, and an Allen wrench is provided. Next, simply attach the sight to the mounting bar in one of two extension bar holes, unlock the knob that lets the carbon rail slide in and out (counter-clockwise turn) and then lock it down (clockwise turn) once the sight distance from the riser is set. I chose to mount the sight closer to the riser in order to increase my range.
Setting my second and third axis was very simple. For second-axis adjustment, loosen the pair of 6-32 hex screws with the included 7/64 Allen. These screws are set in a diagonal fashion just above the white-lettered third-axis leveling point and below the marked, white-lettered second-axis leveling point. After loosening the screws, I squared the scope to the elevation bar/head using a leveling tool (not included) and twisted the scope housing up and down until the scope bubble was centered. Third-axis adjustment was just as simple – simply loosen the 6-32 hex screws on the marked third-axis block. Next, use a leveling tool and push the scope housing in and out until the scope bubble is centered when the bowstring is 90 degrees from the horizon, tilted forward 45 degrees and backwards 45 degrees.
To set windage, press the red windage-lock pin away from the windage knob until you hear a distinct click. This allows you to make small, precise windage adjustments. I loved this feature. Should you need to make a major windage move, loosen the furthest south set screw below the third-axis block.
When setting elevation, use the three-pronged Rapid Elevation Knob to move the Delrin elevation rail exactly 1/2-inch above the top of the elevation bar. This allows you some flexibility when setting your 20-yard pin and ensures full range of motion, which allows you to dial your sight to the furthest distance possible. To make a gang adjustment and maintain the 1/2-inch measurement, loosen the two (very small) hex screws located north and south of the windage knob where the sight attaches to the rail.
After dialing my sight to 20 yards, I moved on to selecting the correct sight tape. This, perhaps, was my favorite part of testing this sight. After making a pen mark on the blank tape installed on the sight, I stepped back to 40 yards, as this is my most comfortable shooting distance. I shot three quarter-sized groups and made my 40-yard mark. After that, I simply matched up my marks with the correct included sight tape. This part of the sight-in process was a breeze and I appreciated being able to choose the two distances I wanted to shoot at.
Lastly, I set my AccuClicks. To do so, I loosened the Ball Détente Pointer located between the elevation gang-adjust screws and moved it as close to the top of the sight as possible to ensure a maximum range of AccuClicks. Then, before actually setting the positon of my AccuClicks at my pre-determined ranges, I customized the feel of the “clicks” by rotating the Ball Détente Pointer counter-clockwise (lighter) or clockwise (stronger). Then I set my AccuClicks and locked them down.
I’m a fan of the AccuClick feature as it allowed me to hit known yardage marks by feel. I didn’t have to look down or take my eye off the target. In addition, I appreciated the sight’s overall brightness, bracketed leveling bubble and durable vertical pin. The sight is built like a tank. It also allows for the attachment of a lens.
As far as accuracy, this sight, though it took me the longest of any tested to set up and fine-tune, proved the most accurate for me. My only concern for hunting is the limited amount of light-gathering the 31mm housing provided.