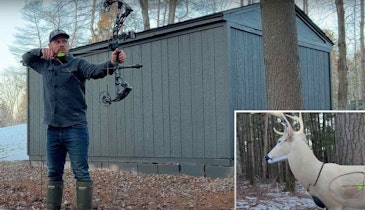
Single-pin sights have always been popular. Why wouldn’t they be? A single vertical aiming point centered in a clutter-free housing. Then, of course, there’s the incredible dial-to-the-yard adjustability. I mean, what’s not to love? And, as with most things in archery, present-day single-pins are better than ever, which is a big reason this sight category has jumped from popular to smoking hot.
I had a blast testing this first round of six single-pin sights from top-tier sight manufacturers. (Round Two can be found here.) I dug deep and explored each sight to the fullest. I found things I loved, things I liked, things I appreciated, things that concerned me and even a few things I would like to see added or changed.
If you’re looking for a new single-pin partner, be sure to analyze this test and the test to come. We’ve done the hard work for you, hopefully making it easier for you to select the single-pin that would be right for you.
CBE Tek Hybrid Pro
I’ve used CBE sights on a number of bowhunts and appreciate the manufacturer’s dedication to keeping the sight smooth, tight and ultra-quiet. After spending more than a week testing CBE’s new-for-2015 Tek Hybrid Pro, I can say the aforementioned qualities are well intact on this advanced single-pin.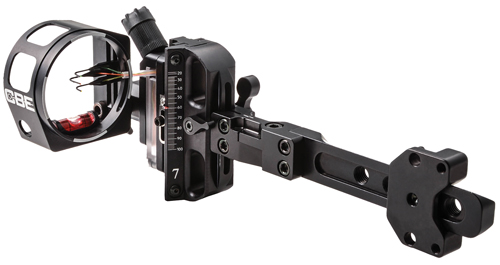
Assembled in the package and ready to go, the Tek Hybrid Pro was easily mounted to my test bow (a Bear Arena 34) in minutes. After shooting a few arrows, I removed the small set screw and adjusted the stainless-steel indicator needle to the necessary position on the sight body to better maximize my yardage tape. Using the ultra-smooth four-point Rapid Drive knob – which was totally friction-free and one of the most efficient I tested – I set my needle toward the top of the tape and went to work.
Dialing in elevation and windage was a breeze via the tool-less adjustments. The right and left indicator arrows on the windage-adjustment wheel save time and allow for precise and proper sight-in. Many tool-less products I’ve tested over the years are sloppy and don’t lock down tight. They wiggle open after a few shots, leaving the shooter constantly checking the sight. That’s not a concern with the Hybrid Pro. Also appreciated was the second-axis leveling feature. Second-axis on the Hybrid Pro can be quickly and easily adjusted by loosening a pair of 8-32 hex screws on the front of the micro-adjust windage unit. The sight also sports ultra-easy-to-use third-axis leveling. To adjust third axis on the Hybrid Pro, loosen the two 2-56 hex screws on the bottom of the sight housing holding the level cradle and adjust. This is a key feature for those who hunt in terrain where extreme up- and downhill shots are possible.
After getting my Hybrid Pro dialed at 30 and 60 yards, I used the included Sight Gauge Tool and attached the appropriate steel sight tape, which was included, by removing a pair of stainless-steel hex screws as well as the indicator needle. The swap was easy, and in less than an hour my Tek Hybrid Pro was dialed out to 100 yards. I love the rear-facing sight tape design as it allows me to keep an eye on my target while only having to glance down at my sight.
As far as durability, the bulk of the sight is built like a tank. My only concern, and it is a small one, is the overall durability of the single vertical pin. The fiber optics are bright, but, compared to other sights in the test, the pin seemed a bit flimsy when pressed on with a finger.
Spot-Hogg Hogg Father
Many World War II historians recognize the Tiger II Tank as one of the most durable armored tanks ever named. I think when it comes to bow sights, the Spot-Hogg Hogg Father will be branded with the same reputation. Plain and simple, this thing is indestructible.
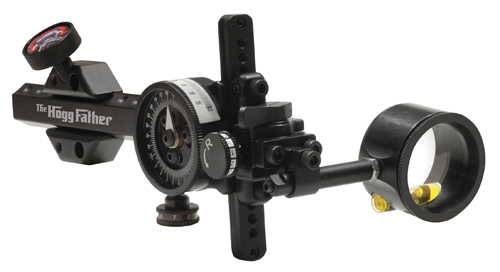 Assembly of the Hogg Father wasn’t overly complicated, and a video is available on the manufacturer’s website as well. I highly recommend watching the Hogg Father “Overview” video before setting up. For those who skip the video, one very important thing to pay attention to – something that will save you future headaches – is to write down the reading on the Bull Knob after you set the bottom of the rack flush with the bottom of the rail. Each time the rack is removed and reinstalled, the scale reading will need to be set back to the appropriate number in order for your yardage marks to be on.
I’ve been shooting a Hogg Father for a couple of years now, and one of the features I appreciate the most is the Quick Release Knob that allows the sight to move in or out along the dovetail bar. For those who shoot regularly, you won’t believe the accuracy you can obtain by sliding the sight further out and away from your bow.
I also appreciate the fact that the main sight body can be moved easily by removing a pair of set screws that attach the sight body to the rack. This allows the shooter to maximize the sight’s adjustability and sight-in at longer ranges. Also sure to be cheered by single-pin fans is the sight’s no-tool micro-adjust windage and elevation. Spot-Hogg has always made accuracy a priority, and the Hogg Father puts an exclamation point on this. The vertical micro-adjust knob located under the Bull Knob (the wheel used to dial the sight to the appropriate yardage), when pushed all the way forward, allows you click-by-click to-the-yard adjustment. I was able, by taking full advantage of the sight’s lengthy rail, to dial the Hogg Father out to a distance of 140 yards. That’s pretty incredible.
Yes, I appreciate the sight’s many micro-adjustments and accuracy-enhancing second- and third-axis features, but what I love most, and what you hard-core hunters will love as well, is how quiet and smooth this sight is. At the shot the sight doesn’t buzz or hum, and the Bull Knob turns like butter. These are necessary hunt features that can make the difference between success and failure.
As far as fiber-optic brightness, I had zero issues with the Hogg Father. A series of wrapped fiber optics circle around the housing like a snake and feed into the durable pin from the bottom.
Black Gold Ascent Ambush
I used the sight from Black Gold for several hunts this past spring. It flew to Canada with me and rode in the back of my truck on the way to the Sooner State. Most importantly, though, it never failed me. A meat-and-potatoes sight, the Ascent Ambush gets the job done. Durable, accurate, quiet, bright and easy to use, this sight is the complete package.
Assembled and ready to go, the Ambush offers an incredibly smooth drive system – one of the first hat-tippers for me. New for 2015, the splined vertical drive increases durability by 80 percent and is silky smooth and oh-so-quiet. Before I even attached the Ambush to my bow I spent a few minutes sliding the sight up and down the rail. I was very impressed.
I attached the Ambush to my bow and, after moving my sight body to the desired position by removing a pair of hex screws located on the sight-attachment end of the dovetail bar, dialed it in at 20 yards. Then I went right to work, making marks with a ballpoint pen on the attached rear-facing white sight tape as I went. Aside from making a few windage and elevation adjustments (Allen wrench needed), I had the sight dialed in in no time. I then matched up my pen marks at 30, 60 and 80 yards with the included (54) marked sight tapes and found the right one.
Another feature of the Ambush that I just have to comment on is its brightness. If I had to give a brightness award in the single-pin category, the Ambush would get it. In addition, I loved the fact that the sight’s brightness is directly regulated by a PhotoChromatic shell that rests atop the housing. Whether I was shooting the sight in ultra-low light or directly into the sun on a 100-degree day, I experienced no halo effect. Also sure to be appreciated is the oversized adjustable level. I loved being able to hit my anchor and focus on the pin while being able to see my level bubble the entire time. No accuracy-robbing basketball eyes needed when shooting this sight.
If I had to make one change on the sight it would be the attachment of the PhotoChromatic shell. It is attached via a single hex screw and, at least on the tested model, created a minute vibrating buzz at the shot. No, it was nothing that will send a whitetail running for his life or even ducking an arrow for that matter, but the small element of noise took some getting used to.
HHA Optimizer Lite King Pin
What happens when you combine 20 years of single-pin sight-making experience with two previous generations of successful single-pin models? Well, in the case of HHA, you get the King Pin.
 Having been an HHA fan for years, I was excited to give its newest model a test drive. As with previous models, setup isn’t complicated. You just use a pair of set screws to attach the housing to the sight body and then use the 10-24 set screws to mount the sight to your riser. Simple.
After turning the ultra-smooth and totally quiet hub wheel counter-clockwise to place the slide in the upward-most position, I mounted my sight housing to the second-axis block in the highest (on the slide) set of holes that still allowed me to sight-in accurately at 20 yards. Yes, this takes some trial and error, but as with any single-pin, you want to maximize your yardage adjustment.
For those that like to get very technical, the King Pin provides easy second-axis adjustment. The second-axis block has a hole at the top and a slot at the bottom for attachment to the slide. Those looking to obtain precision accuracy should avoid positioning the bottom screw in the middle of the slot before tightening. I mounted my bow vertically plumb, snugged down the top screw and inserted the included wrench into the second-axis adjustment screws until the bubble was positioned between the included witness marks. It was a breeze.
I love the King Pin’s tool-less windage and elevation adjustments. These save valuable time when sighting-in. I appreciate the click-type windage adjustment and the fact that I can watch the screw turn while spying the laser-engraved windage marks. Equally appreciated is the fact that HHA puts 1 Click = 1/8” AT 20 YDS on the windage portion of the sight.
I used the already attached set-up spool indicator when sighting-in and, once I had my bow dialed at 20 yards, wrote down the number on the set-up spool closest to the red indicator line. I did the same at 60 and then subtracted the two numbers. The result of my mathematics was 52. I applied the included number 52 tape to my wheel and was dead-nuts accurate out to 100 yards.
If I had to give a hunter/shooter appreciation award, the King Pin would get it. Yes, it was quiet (the Harmonic Damper ensures this), vibration-free and certified HHA-durable, but I appreciated the sight-tape magnifier perhaps more than any other feature. This handy tool reduced eye-squinting when changing yardages and allowed me to dial the sight to the 1/4 yard with ease.
Fuse Helix Slider
I never met a Fuse product I didn’t like, and after spending a week with the manufacturer’s Helix Slider attached to my riser, my appreciation of Fuse remains intact.
Ready for the riser out of the package, the Helix Slider is simple to set up. After attaching the sight to my bow’s riser via a pair of set screws, I loosened the four-pronged knob on the back of the slide and dropped the sight housing as low on the slide as I possibly could. This took some trial and error, but by sliding the sight down a tad at a time via the slider while also adjusting the elevation by loosening a set screw (Allen wrench needed) that directly attaches the housing to the body and taking note of the laser-engraved elevation marks, I was able to drop my sight almost to the bottom of the slide. (Note: When setting up a new sight I always attack elevation and windage individually. I find it’s much easier to concentrate on one rather than trying to do both.) Doing so allowed me to eventually dial my Helix Slider to a distance of 120 yards. This can’t be accomplished if you don’t take the time to maximize the range of your slider.
After I had my sight dropped as far as I possibly could down the slide (the slide is generally smooth, but expect a few bumps and humps at times), I inserted the quick-reference peg, a much-appreciated device that allows the shooter to drop the sight to 20 yards without ever having to look at marks. The peg sports a solid and threaded end. Position the peg in the slide with the solid end pointing out toward you and then insert the provided threaded screw in the back and tighten to set the peg in the slide. This is an awesome feature.
The Helix Slider proved plenty bright in low-light conditions and is very hushed at the shot. I credit this to the Stealth Band that has been wrapped around and incorporated into the housing of the sight. The single vertical pin is all-steel and reinforced well. It stands tall in the housing and proved durable throughout the testing process.
If I had to pick at the sight a bit, I would like to see the fiber optic, which is wrapped around the bottom of the sight housing, more protected. Yes, this arrangement allows the included rheostat light to really light up the fiber optics, but it leaves the wrapped fibers open and exposed to the elements.
Extreme Archery Voyager
Out-of-the-box ready, the Voyager is a classy-looking single-pin sporting Extreme Archery’s logo branded on the integrated sun shade. It’s been over five years since I had the opportunity to test an Extreme Archery Products sight, so I spent a few hours just looking it over. My initial impressions: compact, well-built and reasonably smooth on the slide. The encased fiber optics wrap around the housing and feed into the single steel pin from the bottom, and the sun shade can easily be removed by simply giving it a firm clockwise twist.
 Once mounted on the bow, the Voyager didn’t disappoint. The sight is quiet, not church-mouse, but nothing that will prompt a calm animal to duck a speeding arrow. Setting the elevation was easy – unlock the knob that controls the slide and drop it to the bottom of the included white tape. Then, while shooting a few arrows, loosen the pair of set screws that attach the housing to the main sight body and slide the housing to a positon that allows you to maximize the Voyager’s full range. Windage was a breeze as well – loosen a set screw and slide the sight left or right using the laser-engraved adjustment marks. The windage knob is very smooth and locks in tight.
The sight comes with 18 pre-marked, easy-to-read tapes that go from 20 to 100 yards in 5-yard increments. I was able, using a Bear Arena 34 firing a 28-inch 394.2 grain arrow, to dial the sight to 100 yards, but not a yard over. The Voyager doesn’t offer a long slide range, but do you really need more than 100 yards? After making pen marks on the included tape, I matched those marks with the pre-marked tapes provided and was ready to go. (Note: You won’t always find a tape that matches up perfectly. If you don’t find a tape that matches exactly, I recommend using your own pen marks.)
The single vertical pin was plenty bright and stood tall in the housing, and I appreciated the fact that its all-steel design sported a thickness that prevented any wobble when pressed on with the finger. In addition, the Voyager is second- and third-axis adjustable – the pin itself is easily moved by loosening a small set screw.