Learning how to properly prepare a pelt after a successful trapping run or at season's end can be the difference between making money or losing money.
If you're a novice to trapping and selling pelts, it's not easy. But it's also not brain surgery and can be learned through trial and error, practice and gaining experience with your time and effort. Finding a longtime trapper to learn from is one great way to get started.
Use these proven tips to get the ball rolling for more successful sales.
 The Learning Curve
I must emphasize several key points. First, the best way to learn fur-handling is to have an experienced person show you personally. Second, learn your fur buyer’s preferences. If your cousin Joe recommends one way, but your fur buyer prefers another, remember that cousin Joe isn’t buying your fur.
Third, beginners must accept the fact that they’ll make mistakes in skinning, fleshing, stretching and selling. It’s called learning by experience. Finally, my way is just one way; others have different ideas that also work.
Learn from many sources, then do what works best for you. Since opinions vary, I consulted with several other hunters on this article, including Judd Cooney of Pagosa Spring, Colo., a well-known writer, photographer and outdoorsman; Ray Driscoll of Chiloquin, Ore., a longtime trapper, hunter and fur buyer; and Kevin Maden, Lyle Rilling and Stan Rodgers, all predator hunters and experienced fur handlers from Prineville, Ore. These men are from my part of the country, but experts can be found in all regions. Get to know them; they are a wealth of knowledge. I also got advice from the professional fur buyers at the North American Fur Auction of Stoughton, Wis., and the Fur Harvesters Auction in North Bay, Ontario.
Tools of the Trade
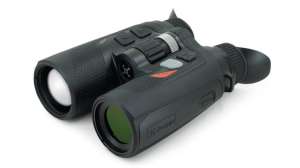
When planning a hunt, clarify the hunt’s purpose. If your intent is merely to shoot predators, all you’ll need is your call, firearm and ammo. If you’re harvesting fur, consider adding items such as surgical gloves, large plastic bags, insecticide spray, wipe rags, a comb and brush, a gambrel, cables or rope, knife, sharpening tool, tail stripper, tail splitter, blunt screwdriver and burlap bags. It seems like a lot of gear, but it makes a compact bundle in your pack and it will much improve your bottom line.
When handling wildlife, rubber gloves will prevent contracting animal-borne diseases. If fleas and ticks are of concern, slip your animal in a plastic bag, fog it thoroughly with an insecticide spray, tie the bag shut, and relax for a while. Remove the animal from the de-bugging bag and wipe and wash off any blood with cold water (snow works great). Use the comb and brush to remove dirt, twigs, seeds and other debris. Carefully remove cockleburs so that you don’t pull out guard hairs. Dry the fur before skinning.
There are skinning options. Some fur buyers purchase whole, “in the round” animals, and I’ve seen ads in the paper offering a few dollars for unskinned animals. This is a valid option for anyone who either cannot, or doesn’t want to process furs. A fur buyer might even prefer unskinned animals because he has to pay less, and the buyer in turn can handle pelts so they bring him the most money. Taxidermists often seek a large, high-quality animal, unskinned so it can be professionally skinned for a life-size mount or rug. Or, you might find a hunter, trapper, fur buyer or taxidermist who will, for a fee, skin an animal and take care of the pelt for you. In any case, make arrangements before going hunting.
If you’ll do the skinning, decide whether will you do it in the field or at home. It’s much easier to skin an animal as soon after death as possible, but many factors can influence your decision. If it’s 30 below with a 40 mph wind and 15 minutes after sunset, you’ll probably opt for home. If you hunt on foot, are miles from your rig, and you kill four 25-pound coyotes, quick math will convince you it’s far easier to carry four skinned-out pelts.
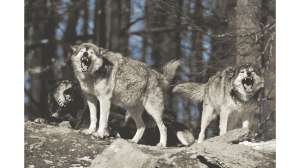
Before skinning, decide how that fur will be sold. Most predator pelts are sold for the garment trade, and that’s what I’ll emphasize here. Some, such as bears, wolves and wolverine, plus a few large, well-furred specimens of other species, can be skinned for taxidermy use. Learn the needs of your taxidermist.
Getting Down To Business
 Although you can skin an animal on the ground, hanging it greatly simplifies skinning. Some hunters prefer a gambrel, while others use a couple of light, loop-ended cables or nylon parachute cord.
Hang your animal by the hind legs, spread apart for working room. Most predators are skinned cased or tubed, with no cut the length of the belly. Some buyers want badgers cased also, while others prefer them skinned open. To be sure, ask your buyer.
The first cuts are made around each leg, just above the footpads. Since they’re cutting through knife-dulling fur, some hunters prefer a separate knife for this “ringing.” If you’re skinning for taxidermy use, keep the feet on and skin out those feet, keeping the pads and claws. From there use a sharp, small-bladed knife. Trapping supply catalogs feature specialty, solid-blade skinning knives that are ideal for use at home. For in-the-field use I prefer a quality pocketknife. Mine has a main 3-inch blade, and a smaller 1½-inch blade for the fine work around the head.
After ringing, cuts on the legs are made with the knife’s dull edge against the carcass and the sharp edge up to slice through the hide from beneath. To case skin, slit each hind leg, from ankle to anus, following the line where the fur changes color. Cut around the anus. For buyers who prefer pelts dried with the front legs out, it’s easier to turn partially dry legs if you slit each front leg up to the elbow, following a line where the fur changes color.
From here, down to the head, you’ll be mainly pulling the pelt off, so for safety’s sake, lay your knife down. Pull the pelt off the hind legs and perhaps a third of the way down the body, to provide you with enough slack for doing the tail. Remove the hide as you’d take off a sock, inside out. If the animal is fresh, you’ll need minimal knife work. When cutting is necessary, touch your sharp knife to that white line where hide and carcass meet, and ALWAYS cut toward the carcass, not the hide.
Slit the tail a few inches on the underside and pull the hide away from the bone, so that there’s room to insert a tail stripper – a two-piece tool that is hinged to allow positioning around the tailbone. Each half of the tool has a half-hole in it, so that when closed there is a round hole for the tailbone. The tool is closed around the tailbone, and pulled downward to strip the tail fur off. Stripping should be done in one firm, definite motion. Yes, you’ll goof a few times until you catch on.
Using a tail splitter or your knife, split the tail the full length. The pelt is now ready to pull off the hide. Hang the critter fairly high so you can use your body weight and not just your arms to peel the hide off the carcass down to its head. You’ll probably not need any knife work except around the front legs.
To skin a pelt open – such as necessary for making a flat rug – slit down the center of the belly, from anus to neck, then down each front leg, to produce the familiar bear-rug appearance.
 Whether skinning cased or open, slow down at the head, switch to a smaller blade, and work carefully around ears, eyes and mouth. Some buyers want the ear cartilage cut off close to the skull while others want it removed. The cartilage can be easily removed and left on the carcass, by skinning down to each ear, then loosening the skin by inserting a blunt screwdriver between the ear cartilage and the hide. Skin around each eye so as not to enlarge those openings, and skin the mouth so that the lips remain with the hide. Skin down to the nose and cut it off so the nose pad remains with the pelt. The lower jaw can be cut off, straight across, a few inches from the end. This is where buyers staple routing cards, to identify sellers. Leave the lower jaw on pelts for taxidermy use. Throughout this skinning process, try to leave any flesh and fat with the carcass.
For transporting unskinned animals, or the skinned pelts, put each in a burlap bag for protection. Many pelts are ruined when tossed in to a pick-up bed, where they freeze to the metal, then are later ripped loose.
Some hunters take their kills home to skin them. Pelts from animals skinned in the field can be rolled, fur side out, placed in plastic bags, then frozen – to be thawed and fleshed later. Try whatever fits your situation, but you’ll soon find that skinning in the field, then fleshing as soon as you get home, is the most efficient.
Time For Prime
All my expert consultants agreed that trappers are more conscientious about proper fur handling than hunters. It’s a marketing mindset because a trapper’s motivation is mainly gathering fur for sale, while hunters are usually motivated by sport and/or predator control, with fur value often being an afterthought.
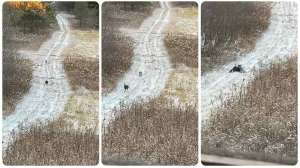
Roger Scheurer has seen many coyotes that were shot too early in the season, before the fur was prime, and with too powerful a weapon, because they were taken incidental to big-game hunting. Ray Driscoll is against shooting predators except when pelts are prime, because he considers it a waste of a valuable resource.
Different species prime up at different times, in different regions. In my home range of eastern Oregon, coyotes are prime from early November through early January, bobcats from December through February, red foxes from mid-October until late December, gray foxes from October to late February, badgers from mid-December through March, and raccoons from early November through January. To obtain similar information for your area, ask other local hunters, trappers, fur buyers and wildlife biologists. For top fur value, hunt only during the times suggested.
In summary, find an experienced fur handler to show you how. Accept the fact that you will learn by making mistakes. Prepare before the hunt with the equipment to care for your kills. Know what you’re going to do with your pelts, including how you’re going to sell them.