If you didn’t know me and you walked into my home office, you would know instantly that I’m a hunter. Framed photos adorn the walls of special trips, good friends and species from dove to antelope. The European mount of my Montana mule deer is mounted to the wall, hanging over my desk, and in the corner, the absolute worst turkey mount on the planet stares at me daily.
These hunting memory items are likely the standard for the walls of most hunters. However, what may separate my hunting memorabilia from others is housed in a 6-foot display case located against the back wall directly across from the office door. In the case, grouped by size and family, are the whitened skulls of approximately 60 different animals I’ve hunted over the years. While I do own two standard wildlife game mounts, I’ve been drawn to European mounts almost my entire hunting career.
For more than 20 years now I have maintained and used a thriving colony of dermestid beetles in my shop to produce quality European mounts for myself and customers across the country. I have cleaned hundreds of skulls, from ducks to elk, over the years and by far the best way to create a unique and memorable European mount of your hunt is by using dermestid beetles.
Dermestid beetles are a species of larder beetle and are indigenous to most of North America. Dermestes maculatus is a species of dermestid that has been frequently cultured in captivity for decades and has proven to be the perfect tool for preparing European mounts, museum specimens and bone articulations.
Dermestid beetles come in two life forms; the adult beetle, responsible for egg laying, and the caterpillar-like larvae. After emerging from the egg, the larvae go through five to seven stages of growth in about 45 days. The larvae are the workhorses of the colony and are responsible for most of the skull cleaning. Once they reach their maximum size, the larvae spin themselves into a small cocoon and hatch into a fully formed beetle in about a week. The beetles start reproducing almost immediately and begin laying eggs.
The beetles are harmless and relatively easy to raise. They don’t bite and have no desire for anything other than dried out, dead meat. They do require good ventilation and a constant, working temperature of between 70 and 85 degrees. My colonies are kept in 50-gallon aquariums and each are equipped with a heating, cooling and venting system.
If you’ve ever thought about getting a European mount produced using dermestid beetles, here’s a brief description of how the process works.
Hunter Preparation
Before you consider having a skull cleaned using beetles, it definitely needs to be skinned. Parasites, like mites, will hide in fur and feathers and should not be introduced to the beetles. The skull should also be kept as fresh and free of decay as possible. I recommend that hunters keep their trophy on ice or frozen until they are ready to have it cleaned.
When I receive a skull, I’ll place it in a freezer for a week as an added precaution against parasites. I have also refused to clean several skulls because they weren’t cared for properly and were already in early stages of decay. I’m not willing to risk the health of my colonies to clean a stinky, dirty skull. If you plan to have a skull beetle-cleaned, skin it as soon as you can, keep it clean and get it in the freezer quickly.
Processing
Despite their almost unimaginable appetite, there is a certain amount of skull processing involved before you place the head in with the colony. After the freezing process, I’ll let the skull thaw. I then start the actual processing. While the beetles will eat any of the meat left on the skull, I remove the eyes, tongue, brain and any heavy muscle meat. This will make the cleaning process go a lot faster.
Once the meat is removed, I’ll set the processed skull in front of a fan for several hours to dry out the remaining meat. Dermestid beetles prefer drier flesh and will clean the skull faster and more completely when I take the time to dry out the head. If I can handle the skull without feeling any wetness after a few hours of drying, I know it’s dry enough for the bugs.
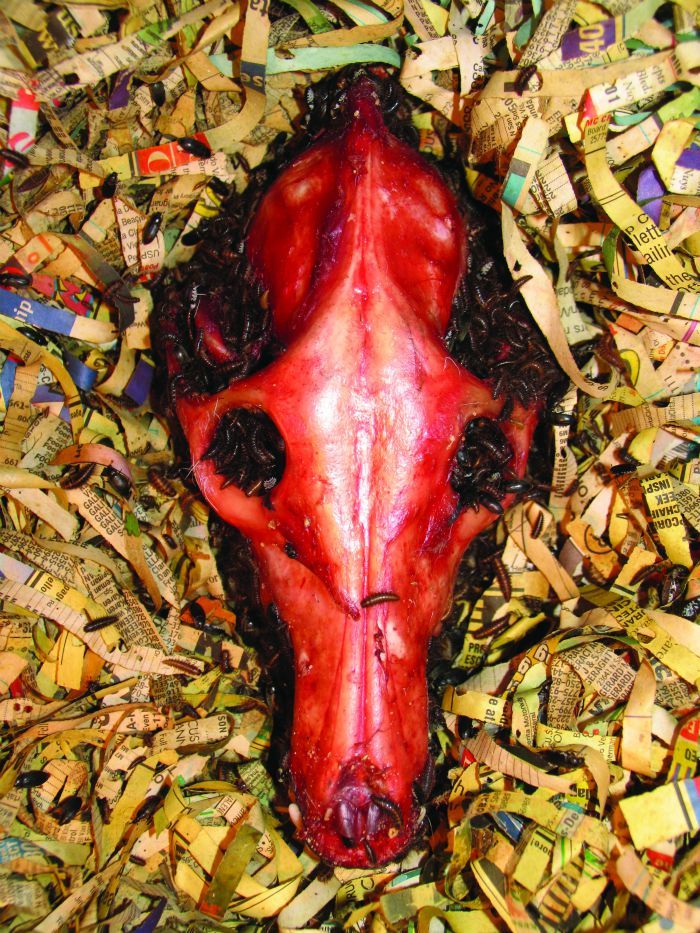
In with the Colony
After the skull is dried, I’ll make a small hollow in the bedding of the colony. The skull is placed in the depression and covered with the bedding material. Covering the skull gives the beetles a dark, insulated environment when they begin cleaning the skull. A healthy, “hot” colony will contain several thousand bugs of both larvae and beetles and can completely clean an average sized deer skull in about two days when processed correctly.
During the cleaning process, the adult beetles will lay eggs on the skull. These eggs will take two to three days to hatch and the young come out hungry and ready to eat. To ensure the eggs hatch and the next generation of larvae is added to the colony, I will usually leave a skull in with the beetles for a few extra days.
I will periodically check on the progress of the skull during the initial cleaning. I like to make sure that the general area around the skull stays dry and I’ll even rotate the head to make sure all areas are being cleaned. After each inspection, I’ll cover the skull with bedding material again.
Whitening
Skulls differ in coloration once the beetles are finished cleaning them. Some are off-white and some are gray in coloration. To get the skull color to the preferred whiteness of your standard European mount, you will need to whiten it.
It’s important to note that bleach is not used for this process. Standard concentrations of bleach will eat away at the bone material and heavily degrade the skull. Whitening skulls properly is done with hydrogen peroxide at a medium concentration. Peroxide in the 10 to 20 percent concentration range is adequate to whiten most animal skulls.
Skulls should be completely submerged in this medium strength hydrogen peroxide for a few days for the best results. It’s also important to know that if you accidently get peroxide on antlers or horns, they will turn white as well. Repeated soaks in fresh hydrogen peroxide will further whiten the skull.
The higher concentrations of peroxide will burn your skin if you come in contact with it, so always wear gloves and safety glasses when it’s time to whiten your trophy.
After the peroxide soak, place the skull in the sun to dry. The UV rays of the sun will react with the drying peroxide and brighten it further.
A quality European mount is a great way to memorialize your hunt and a properly cleaned skull can be displayed in a variety of different ways. The cost and turnaround time for a skull mount is usually a lot less than the traditional mounts and it’s a unique way to remember your hunt.
There are a number of beetle culturists available online, providing information on raising and caring for dermestid beetles if you decide to start your own colony. Dermestid Inc. is an online dealer in dermestid beetles, offers informative DVD’s, beetle starter kits and all the information you’ll need to successfully start your own colony.
If you have any questions or want more information on dermestid beetles, contact Tim Hovey at (661) 645-0022. I’d be happy to help you get started.