When I first started archery hunting, the topic of tuning a bow wasn’t even a thought to me. I didn’t even know something like that existed. All I thought was put the arrow on the string, yank it back, and let it rip toward the target/animal. If you were good, the arrow would hit somewhere around where you were aiming.
The fact is you don’t know what you don’t know. And I know I’m not the only one with this background.
Fast-forward to present day and that kid who knew nothing of the sort when it came to bow tuning couldn’t imagine not doing so today. Having a properly tuned compound is essential for consistency, and consistency means accuracy. A tuned bow is one that is shooting arrows as straight and true as possible. This is achieved by a series of meticulous adjustments. There are several ways to go about making these adjustments, but they all have the same goal in mind: proper arrow flight.
Proper arrow flight provides better penetration downrange and more margin for error once the blood starts pumping. Both are huge advantages for hunting situations. An arrow flying straight and true will deliver concentrated energy through its target, as opposed to one that has wonky flight and misplaced energy. And we are always less than perfect when nerves are running and we’ve got a case of the shakes in front of an animal.
In the paragraphs to come, I’ll walk through four basic ways to tune a bow. These are all fairly simple and involve minimal equipment. I’ll cover the right kind of gear information for a new bowhunter looking to up their archery game. Before doing any of this, make sure your bow is properly set up, bubble level on your sight is calibrated, and you’re using a proper arrow spine. Shooting form matters as well. Be sure you’ve got consistent form for best results. Always consider these factors before you start making gear adjustments.
Each of these methods are ones I’ve used with success. There is more than one way to skin a cat. These are just how I’ve done so.
1. Paper Tuning
Paper tuning is when one shoots an arrow through a sheet of paper in order to observe the type of tear that results. The tear will tell the archer if the arrow is indeed flying straight or not. If the hole looks like a perfect bullet hole (not including the fletching cuts), then the arrow is flying relatively straight. If the hole has a slight rip off center though, you’ll know the arrow is in fact not flying straight and an adjustment needs to be made. Paper tuning is a great place to start the tuning process. Think of it like bore sighting a rifle. It won’t get things absolutely perfect, but it’ll get you on the right track.

Paper Tuning Tips
To start things off, this is the one method that does involve some minimal equipment. Of course, the staff at a local archery shop can paper tune your bow, but you can make your own paper tuning setup with some PVC pipe and either a roll of butcher or wax paper. Just create a square frame and stand with PVC pipe and then clip a sheet of paper to the top and bottom of the inside of the frame. Make sure the paper is relatively taut. This is going to help provide the best results. Also, be sure to have some kind of target behind the paper to use as a backing; when the arrow passes through the paper, it’ll travel right into the target. (An option to building a tuning stand with PVC pipe is to cut a large opening in the bottom of a large cardboard box, then tape a sheet of butcher paper over the opening. Stand the box on its side in front of a target and you’re ready to roll.)
Now it’s time to shoot. Position yourself 3-5 feet from the paper (try to shoot level into the paper) and then fire an arrow through it. Observe the tear and adjust from there. Basically, if the round hole is left or right of the fletching tears, you’ll move your arrow rest toward the round hole very slightly. If the round hole is above or below, you’ll either move the rest away from it or move your nocking point toward the hole. Either will work. Now, if there are multiple issues in the tear, say the hole is high and right, take care of the vertical issue first and then move on from there.
There are several other adjustments that will affect a paper tear. Adjusting the arrow rest is the easiest to do, though, without a bow press.
2. Walk Back Tuning
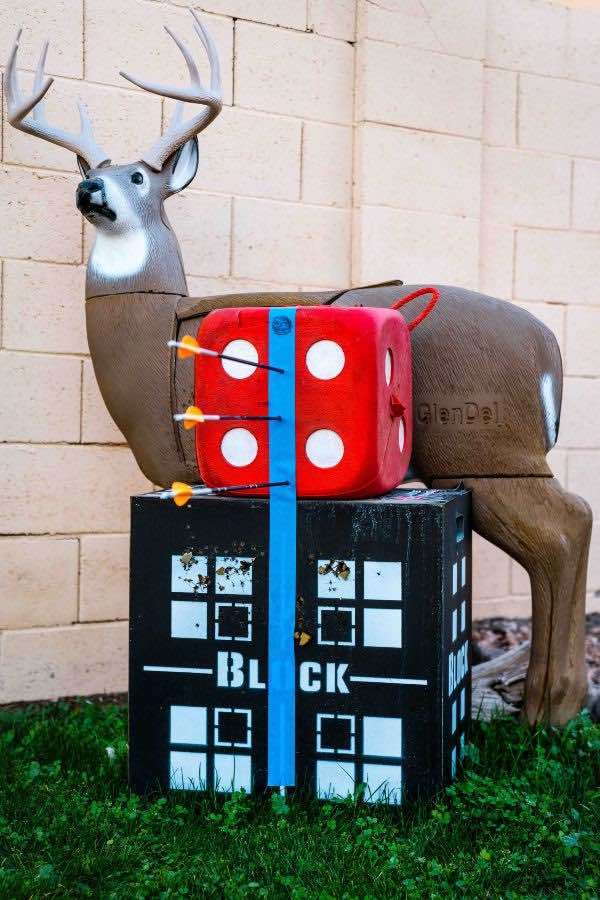
This next tuning method is really great for fine tuning a bow after you’ve paper tuned it. Walk back tuning is pretty self-explanatory. The process will start off by shooting at 20-30 yards followed by walking back to greater distances to shoot after the fact. You’ll be aiming at some sort of vertical line placed from the top to the bottom of a target. Masking tape works great. Hunters will also use a string hung with a weight at the bottom of it to keep it straight and still. What we’re looking for here are minor inconsistencies in our left/right impact points as our arrow falls in flight. As we step farther away from the target, these inconsistencies will be magnified and allow us to make the proper adjustments to remedy them.
Walk Back Tuning Tips
For this, you’ll need two foam targets, masking tape, and a set of Allen wrenches. Set the two targets on top of one another. The taller the target, the farther you’ll be able to walk back and shoot, because you’ll be using your top pin throughout the whole process. By having the taller target, you’re giving the arrow more room to fall at those greater distances.
Now, place your vertical line on the target. This HAS TO be level. If it isn’t this whole thing isn’t going to work right. The line needs to be truly vertical. This can be achieved with either a level or by hanging a weighted object from a string. Draw some sort of aiming point toward the top of that line. It is crucial that your bowsight’s bubble level is calibrated as well for this.
Shoot an arrow at a closer distance (no more than 20 yards) aiming at that point you just created. If the shot is off, adjust your sight until the arrow is hitting right where it needs to. Once it is, it’s time to start walking back.
Move back an additional 10 yards and use your top pin to aim at the same point from before. Shoot a three arrow group. Your arrows will hit lower than the bull’s-eye, but pay attention to where they hit in relation to the line. If they are grouping in the middle, then all is good and you can move back more. If not, you must adjust your rest. For groupings to the left, move the rest slightly to the right, and I mean slightly. A little goes a long way. Do the opposite for groupings to the right. This will bring the arrows into the center of the line.
Continue this process out as far as you are comfortable shooting and your consistency doesn’t start to wane.
3. Bare Shaft Tuning
Out of the tuning methods I’ve been going over, bare shaft tuning is probably my personal favorite. The process of bare shaft tuning is when one strips an arrow of its fletching and shoots the bare shaft of an arrow, hence the name. By taking off those fletchings, you’re taking away the steering they provide during arrow flight. The result is an arrow that will magnify any tuning issues when compared to that of a fletched arrow.
Bare Shaft Tuning Tips
What you’ll need in order to bare shaft tune is a target, Allen wrenches, a fletched arrow, and an arrow that has had the fletch cut off at the base. The reason for this is if you were to cut off the entire fletching down to the arrow shaft you’d be changing the performance of the arrow by adjusting arrow weight and the F.O.C. (front of center). You want the fletched arrow and non-fletched arrow to be as identical as possible, so they fly as similar as they can under these circumstances. One of the goals of tuning is consistency, and you need consistent components in order to get there. Use field points on both arrows.
Before trying this method, make sure your bow is sighted in at 20 yards with fletched shafts. They need to be grouping well. Once that’s been done, you’re ready to dive in.
Start by shooting a fletched arrow at 20 yards. If you’ve done your homework, that arrow should sail right into the bull’s-eye. Next, pick up that bare shaft and give it a whirl. Do this a few times with the fletched and bare shaft to really shine light on the differences, if any, between them. If the bare shaft groups with the fletched, all is good. If not though, adjustments are in order.
Left/Right Misses: For left/right variances between the bare shaft and fletched, you’ll want to move your arrow rest in the direction of the bare shaft. Do this very slightly. Try 1/32, or even 1/64, of an inch. A little goes a long way. This should begin to bring the two arrows together. At this point, don’t pay attention to where they are hitting in relation to where you are aiming. Right now, you just want to get them grouping together. If they don’t come together, this is an indication of an arrow spine issue. Hits to the right indicate an under spined arrow, and hits to the left indicate an over spined arrow. When the arrows are grouping well together, simply adjust your sight to bring them back into the middle.
High/Low Misses: For high/low variances between the bare shaft and fletched, things are a little more complex. On the surface, one can simply make a rest adjustment in the opposite direction of the bare shaft. So, if the bare shaft hits low, move the rest up slightly, and the opposite should the bare shaft hit high. Remember, make very small adjustments. Along with that though, it would be wise to check both cam timing and if any nock pinch is present. I won’t go into too much detail here, but have your local pro shop check for these should you be having any high/low misses. I’d do this before making any adjustments.
After you’ve gone through this process, you likely won’t have to make any adjustments once a broadhead is put in play. If you do, it will be very minor.
4. Nock Tuning
For the last tuning method, I’ll go over nock tuning. It’s a simple but effective way to manipulate impact points downrange. It’s when one grabs the nock and twists it within the shaft a bit. I stumbled onto this when I realized a few of my broadhead-tipped arrows were hitting slightly differently from the others. So, I started playing with the nock and got the desired results after the fact.

Nock Tuning Tips
All you’ll need for this is a target, Crayon, and a marker. Start off by setting aside any stubborn arrows that are consistently not hitting right in the bread basket. For arrows that are hitting good, there is no reason for any adjustments, so leave them be.
With your Crayon, draw a line from the nock onto the shaft of the arrow. This is going to serve as a reference point for when you start turning the nock. Turn the nock to the next available position in relation to your fletchings. Shoot an arrow and observe the results. If the arrow is where it should be, take your marker and draw a line from the nock onto the shaft. I like to draw the line on the top side of the arrow after it’s on my string. This is an easy reference point for when nocking an arrow in the field. The line faces up. Wipe away any Crayon lines still on the shaft.
Repeat this process with all of the stubborn arrows. I’ve been very pleased with this method. It’s minor, yes. But after you’ve done the brunt of the tuning work ahead of time, minor adjustments are all that are needed.

Tuned Up
In the end there are many things that one can do to affect the tune of a bow, and they all work. Going to a pro shop and having them get your bow tuned with you is great. However, being able to take care of some of this stuff on your own just makes for a more efficient bowhunter. It allows you to recognize when something isn’t right and be able to fix it right there on the spot. What happens when you get to a trailhead in a different state and realize your bow is slightly out of tune after a few practice shots? By being able to handle it on your own, you’ll walk right into those hills with much more confidence. And confidence kills.
Photos by Josh Kirchner