For many waterfowlers, carving their own duck decoys is something they have contemplated but never put into action. The reason for this is simple: They don’t know where to start or where to get materials, and eventually their time gets occupied with other projects. While there are many good resources on the internet, books available for purchase, and forums where carving legends can be chatted up, sometimes the best way to get started is to simply take the plunge and learn as you go. By utilizing pre-made cutouts or kits, you can make decoys with minimal tooling investment, allowing anyone to whittle out a few special blocks for the upcoming season during drab summer months.
Step 1: Preparation
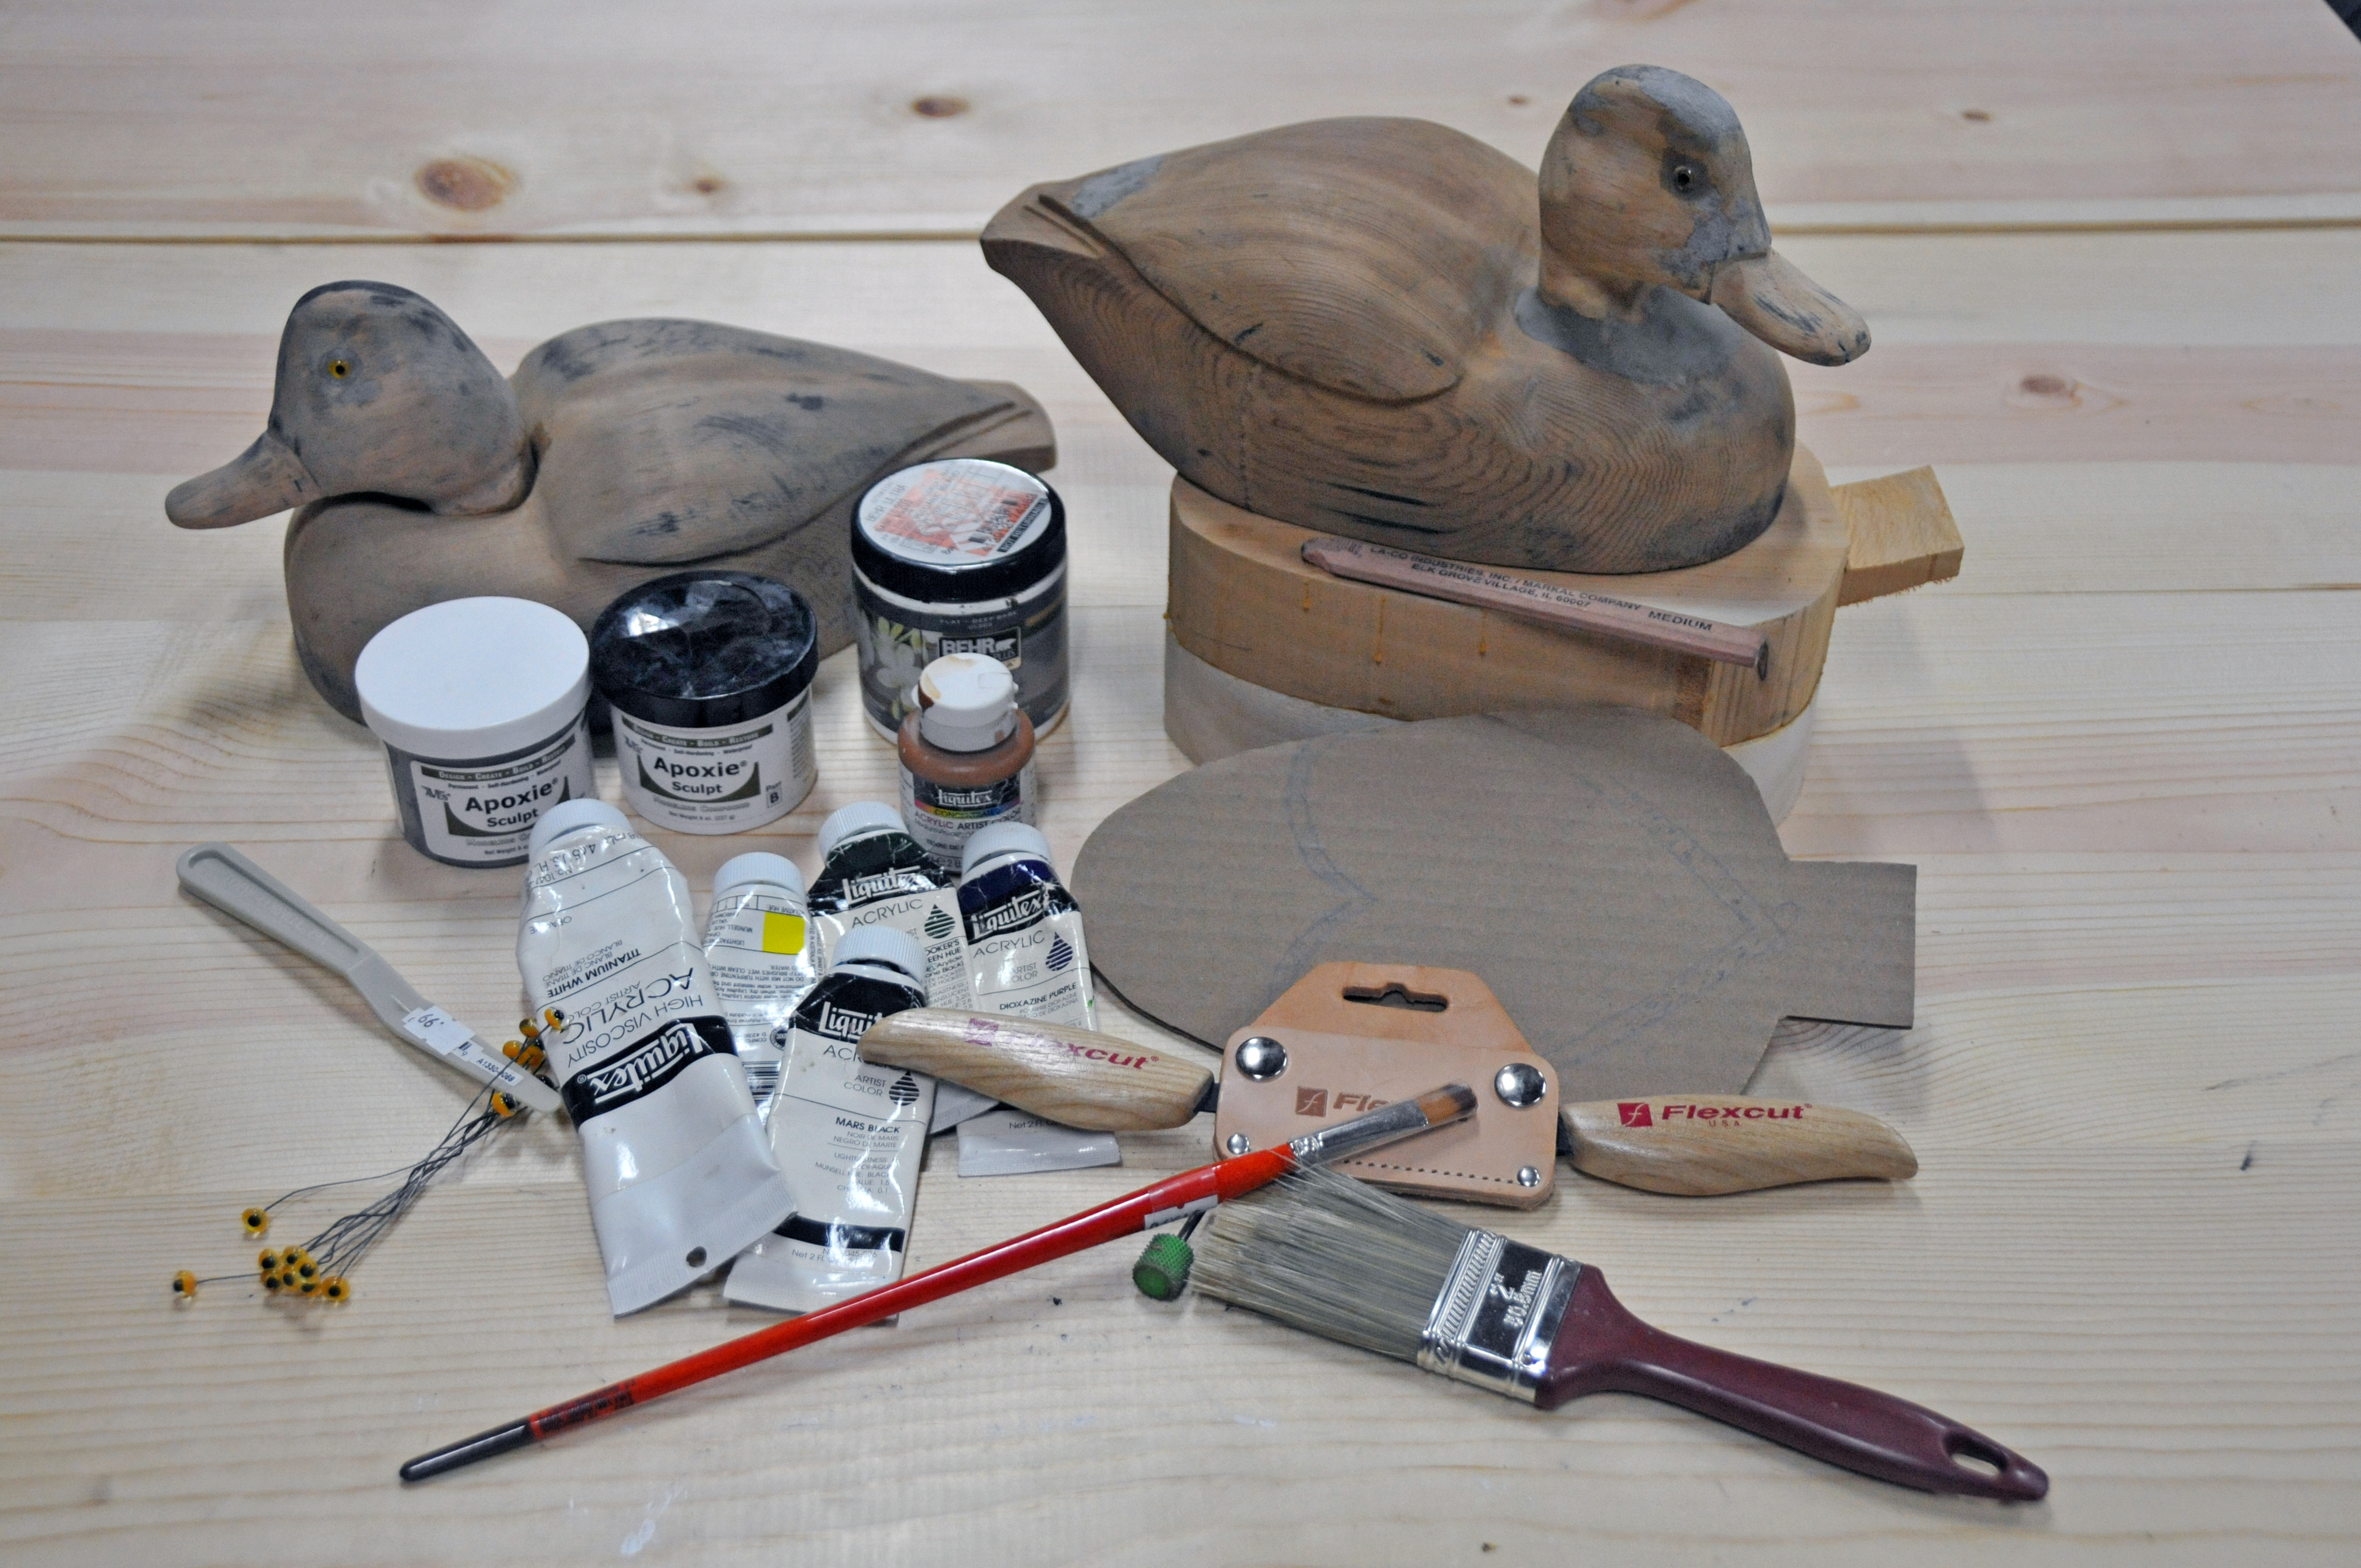
Whether cork, wood or even foam, the tooling list for most decoy medias remains consistent. While decoys can be made a variety of ways, for the purposes of this instruction, the equipment list below focuses on generally available tools that you might already have around the garage, helping to minimize initial investments. To find decoy blank cutouts, parts, components and other items, check out the theduckblind.com. This site also has many instructional articles to help sort things out, should you get stuck.
The steps below are suitable for either wood or cork decoys, and even foam, with some nuances. All media carves differently, with cork being the easiest for newcomers to start with, and foam being the cheapest but requiring the most work after carving to create a rugged outer shell.
Using mostly garage or shop items, most carving newbies have everything they need already, keeping initial investments to a minimum.
Equipment/Parts List:
Pencil and Paper
Roughed Out Decoy Cutouts or Cedar/Cork Blanks
Bandsaw (necessary for those starting with a true blank)
Glass or Acrylic Eyes
Calipers
Dremel Tool w/ Multiple Bits and Sanding Wheels
Rasp File
Power Drill w/ Bits and Screws
Sandpaper
Wood Glue (TiteBond, Gorilla, etc.)
Apoxie Sculpt (Used for blending joints, filling in mistakes, etc.)
Sealer: (wooden decoys- Traditions Multi-Surface Sealer, cork decoys- Traditions Cork Sealer)
Paintbrushes and Acrylic Paint
Patience
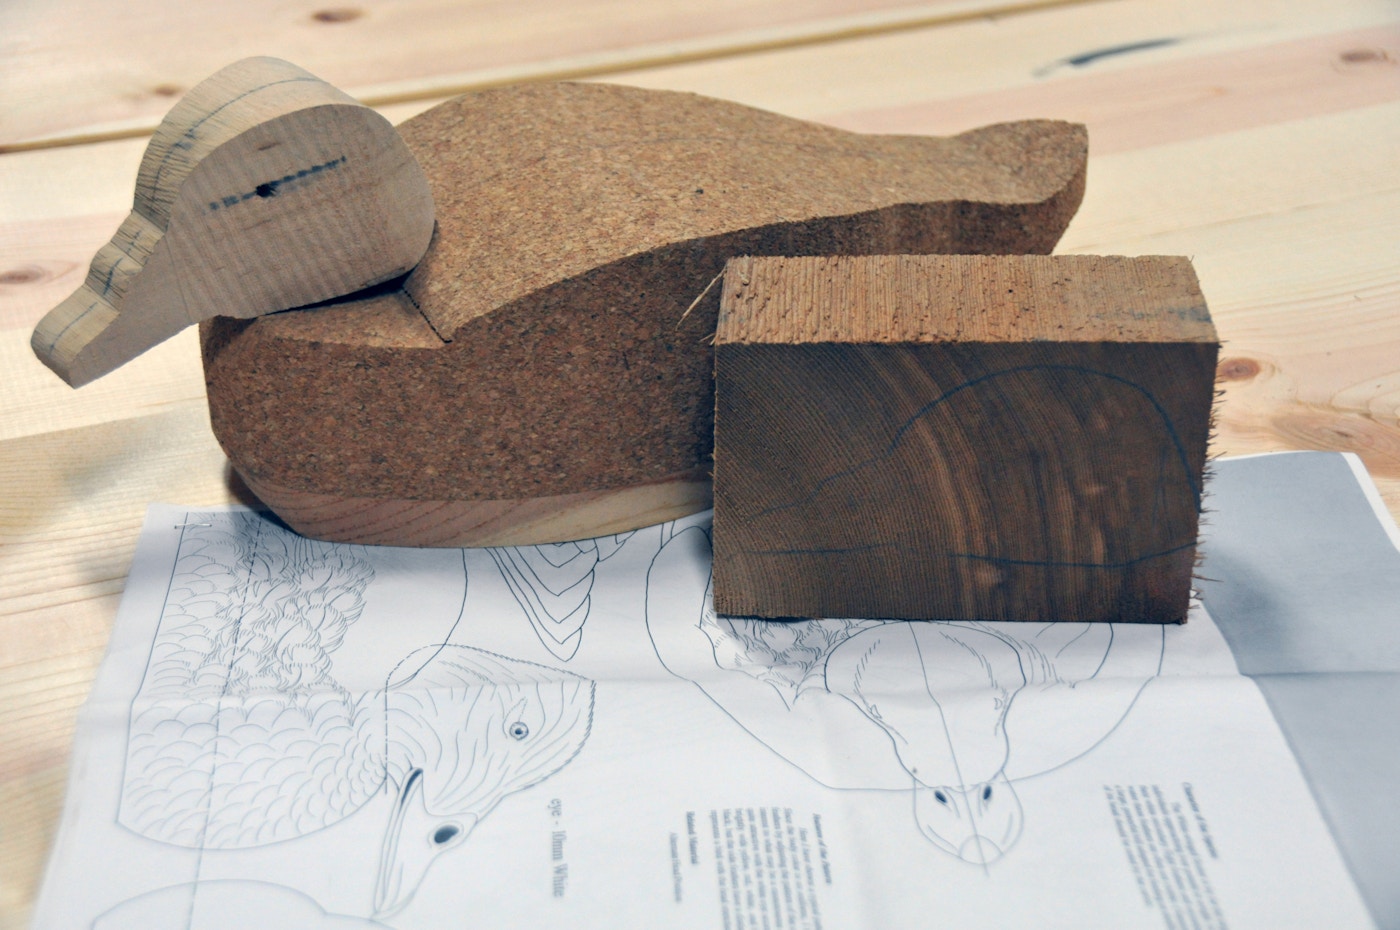
Step 2: Layout
Laying out decoys properly is imperative to the finished product actually looking like a duck. With a roughed-out or cutout kit, most of this work has been done for you. For true blanks, start by either drawing your own pattern or using one from a decoy pattern book. Once the pattern is ready, trace it onto the decoy and carefully start cutting off excessive material with a band saw.
Once the roughed-out decoy is complete, begin refining the shape of the decoy by drawing “half” lines down the center of the body, side of the body, and around the crown of the head. These centerlines keep things proportional by providing a good reference line so parts don’t become asymmetric. If desired, additional ¼ and ¾ reference lines can be added to make it easier to keep things equal, especially in areas where rounding will occur. In addition to reference lines, draw in eye channels on the head to help find the proper eye set location, bill details like nostrils or nails, and any carving details desired to the body like wingtips or side pockets. Once all details have been completely drawn out, drill the holes for glass eyes using a drill bit that is very slightly larger than the diameter of the eyes intended to be used, making sure they are parallel side to side and front to back. It’s a simple task, but these holes really bring a decoy head to life and allow carving to commence.
Step 3: Carving
In order to make a decoy that doesn’t look like a head and body were just screwed together, make sure that, during carving, you frequently mock-fit the head and body together to ensure their profiles are suitable matches for one another.

Start off by taking minimal material with each pass, and increase this amount as confidence builds.
Start by taking off small amounts of material, remembering that once it comes off, it can’t be replaced. For most new carvers, it takes some time to figure out the perfect amount to remove with each pass, and this skill will be developed over time. Shave down the decoy equally on both side and use calipers to ensure dimensions are duplicated on both sides of the decoy. Decoys can be made with lots of detail, or rather basic, letting the paint do the detail work. The main thing to remember is that ALL details should be symmetric, and the decoy, if cut in half down the length of the body, should be a mirror image. For a more pleasing look on the water, the decoy should be rounded at the bottom, starting up about 2 inches from the bottom.
Be especially careful when carving the head, especially around the bill, as it can easily start to look odd and can turn from duck bill to crow beak in just a few quick passes. A good way to avoid the bill becoming disproportional is to carve the majority of the head before even rounding the ends of the bill. This allows the carver to have a better bill-to-head size reference and the head shape to be representative, allowing the bill to essentially flow out of the head. Once the head is nearly complete, using Apoxie Sculpt, set the eyes and then finish smoothing the head and blending transitions.
While aesthetics are important, don’t get too wrapped up in making the perfect decoy the first time — it takes lots of practice to turn a vision onto reality. Decoys two and three are always better than the first.
Step 4: Construction
Once the head and body are carved to your liking, it is time to fit them together for final blending/finishing. Start by attaching the head to the body in a predetermined location by using a screw or screws and some wood glue. Once the two components are solidly attached and the glue has dried, use Apoxie Sculpt or another type of sculpting material to help blend the neck and body joints and touch up any big divots in the body.
This is also a good time to at least begin fitting a keel, if desired, to the bottom of the decoy. The shape of the keel can be as basic as a rectangle or as detailed as a half-moon, but the important thing is that its size fits the bird. Keels can be attached with screws and glue or just screws alone, but should be left off until the bottom of the decoy has been primed with paint. You can also pour lead into holes drilled into the bottom to help the decoy self-right, or attach a lead weight to help accomplish this task.
Step 5: Final Finishing
Start this step by using 80- or 100-grit sandpaper to smooth the decoy, making sure to get inside all the nooks and crannies to contour the decoy’s shape. Sanding can really make features stand out by creating sharp, precise transitions. As the wood smooths, start decreasing the grit size incrementally down as low as 250 to ensure that small defects and scratches have been removed. It is important to remember that defects will become more visible once paint has been applied, so take some time to check and double check that every area of the decoy is silky smooth. Once sanding is complete, seal the decoy with an appropriate sealer for the media (see list above) with a minimum of two coats before moving onto paint. Some sealers may raise the grain slightly, so make sure to knock it back down with small-grit sandpaper or even steel wool before priming.
Step 6: Paint

Painting is a skill learned over time, so start simple and add more features as your skill increases.
Ask 10 different carvers what type or brand of paint they use and you will get 10 different answers. For new carvers, acrylic paints are the cheapest and easiest to work with, as oils require mixing, cutting and other aspects that require more extensive knowledge. For acrylic painting, anything from exterior house paints to craft-store tube paints can be used, mixed and intermingled, making them a great choice. They also clean up with water, making them easier to deal with, and mistakes can be easily wiped away. In all applications, paint or prime the entire decoy in one color, likely white or black depending on the outer color of the finished decoy; i.e., a white base for canvasbacks and black for black ducks. After one or two base coats have thoroughly dried, start working in outer colors and details using appropriate colors and techniques. Decoys can also be textured using a comb and some gesso, should that look be desired. While experts can make the details look easy, novices will find that painting intricate detail can be frustrating. Start with the basics and work in whatever details your hands can create. While fine feather details are great in hand, from a distance, they make absolutely no difference to the birds — so don’t get hung up on them if things aren’t perfect right away.
Overall, have fun, get creative, and work to get better. Even the best carvers started out with basic decoys, so don’t get discouraged if your first bird looks more cormorant than canvasback. While carved decoys are certainly more expensive than manufactured plastic decoys, they add some nostalgia and a personal touch to an otherwise standard decoy rig.


