The buck broke cover at a sneaky trot, angling toward a shallow drainage ditch that would provide his escape route across the corner of an expansive wheat field and into the mystery of Olie’s Swamp a half-mile away. His body language told me he was reluctant to leave the relative safety of the gnarly aspen and alder underbrush. I say “relative safety” because the buck was being hounded. It was the opening morning of Minnesota’s whitetail gun season, and the Ravndalen Gang — of which I’d been a member since I was old enough to follow my dad through the woods — was conducting its first deer drive of the morning. The buck had two choices: He could steel his nerves and try to slip back between the drivers, or he could make a run for it.
A handful of scruffy North Woods types, dressed in blaze orange — including both my brothers — were beating the brush, and we’d strategically placed posters on the far end of the 80-acre woods we were pushing. I was walking the east side of the field edge because deer, especially mature bucks, had a tendency to break out in the middle of the drive and make a mad dash across the open field to The Rock, a kopje-like outcropping that serves as a gateway to miles and miles of deep boreal forest dotted with impenetrable tamarack swamps.
I dropped to my knees and slid my rifle up onto the shooting sticks as the buck paused to reconnoiter before committing to the dangerous crossing. I could scarcely believe my good fortune. He was looking back over his shoulder and hadn’t seen me. I was well aware of the short window of opportunity before I’d have to calculate for windage and elevation as well as lead once the buck kicked in the afterburners. I did the quick math; I was almost to the south end of the rectangular 80 and knew it was a good half-mile to the north end, and I visually split it in half — 400 yards. The buck was somewhere in the neighborhood of three-quarters of the way down my half of the split, which put him somewhere between 250 and 300 yards — and within my rifle’s maximum point-blank range of 318 yards. I centered the crosshairs at center mass behind the deer’s shoulder and tugged the trigger. The buck made a mad dash for the far side of the field but fell far short.
A good part of why I was able to quickly and confidently make the shot on that buck was that I’d properly sighted-in my rifle for the myriad conditions I might encounter in the field that day. Throughout the course of the hunt, I’d likely serve duty as a driver, poster and flanker, and possibly shoot from a variety of ranges, from point-blank in the bush to several hundred yards out if a deer broke onto a field where I was posting. And I knew opportunity could come as quickly as a heartbeat. Rather than having to calculate for bullet drop in a flurry of activity or dial a ranging turret up or down, I’d elected to use a method of sighting-in that would take all of the guesswork out of where to hold — by adjusting my riflescope for maximum point-blank range (MPBR).
Many of the old-school hunters I know zero their rifles at 100 yards and then hold over to compensate for bullet drop at longer distances. Say they’re shooting a 180-grain bullet chambered in .30-06 that exits the barrel at 2,750 fps. Depending on the specific bullet design, when sighted-in at 100 yards it will drop about 3½ inches at 200 yards, 13½ inches at 300 yards and 30 inches at 400 yards. The same bullet zeroed at 200 yards will drop about 8 inches at 300 yards and 22½ inches at 400 yards. Making the shot requires a fairly accurate guesstimation of range and a good idea of where to hold. Add a moving target and, well, things can get complicated.
My techy friends are more likely to top their rifles with one of the many ballistic-compensating riflescopes that are all the rage these days. These scopes utilize hash marks or adjustable turrets to remove the necessity of holdover. You either select the hash mark that corresponds with a predetermined distance or dial the turret to pre-programmed yardages. Some optics companies will even custom program your scope for you. All you have to do is provide some basic ballistic information.
There’s nothing wrong with either of these approaches, but I’m a big fan of keeping things simple, especially when I know how unpredictable real-world whitetail hunting can be. To my way of thinking, calculating and then applying the MPBR method of sighting-in is as basic and effective as it gets. Here’s how it works.
Calculating MPBR
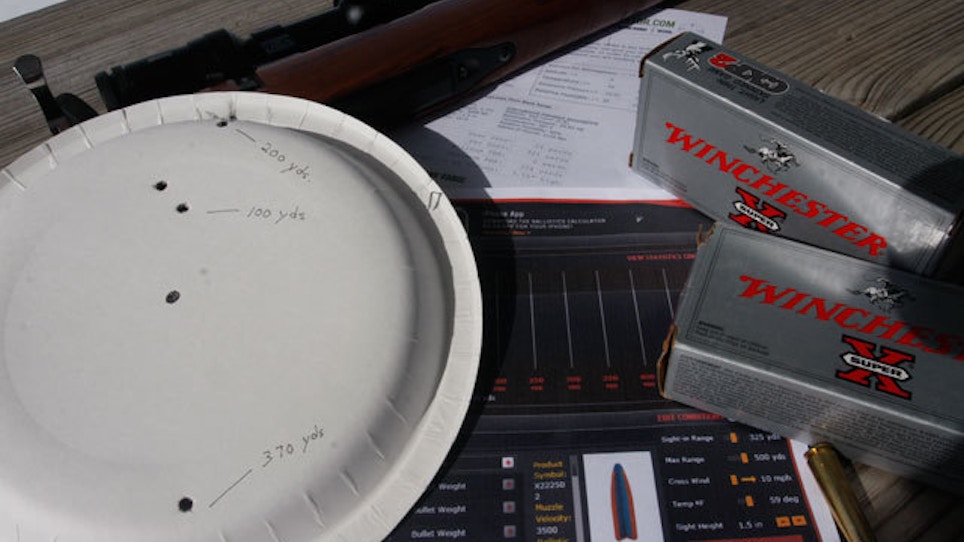
Maximum point-blank range refers to the distance out to which you can hold your crosshairs on center target and achieve a lethal hit within an animal’s vitals. Imagine shooting at a 10-inch-diameter paper plate with an X marking its center. You simply adjust your scope so that when you aim at the center of the target, the bullet will not rise above or fall below the top or bottom of the pie plate from zero yards out to your determined MPBR. That means that on an animal you can hold dead-on from zero out to your maximum point-blank range and your bullet will strike vital organs.
For whitetails, the kill zone is approximately 12 inches from the top of the vitals to the bottom — 6 inches above or below point of aim, which would be center mass of the deer. But there are real-world variables to consider, such as the accuracy of your rifle, which might throw a bullet an inch or more off target at 100 yards, and shooter error, which can easily account for another inch or two, and miscalculation in range. So to be safe, subtract another 2 inches to account for these factors and reduce the effective kill zone to 10 inches diameter. Now, if you hold dead center on a deer, your bullet can hit 5 inches high or 5 inches low and you’ll still have a lethal hit.
Fortunately, there’s no shortage of tools available to help you calculate the MPBR for any of your favorite whitetail cartridge/bullet combinations, including handloading manuals, ballistic charts and shooting websites. Probably the easiest way to calculate MPBR is to do a quick Google search to locate a website that features a ballistic calculator. I found several, and I settled on www.shooterscalculator.com because it’s intuitive and easy to use — all you have to do is punch in the numbers to get the MPBR results for your cartridge and bullet. Here are three common whitetail calibers I entered into the calculator to provide some examples. While there are many variables that will affect MPBR, like wind velocity and direction, altitude, temperature, barometric pressure, etc., for the purpose of this discussion I’m most interested in muzzle velocity and B.C., or ballistic coefficient, which describes the bullet’s effectiveness in overcoming air resistance during flight — so I’ll keep all other variables consistent across the examples. I set the calculator’s parameters for a whitetail’s 10-inch vital zone.
.30-30 Win./170-grain Nosler Partition/2,200 fps muzzle velocity/.313 B.C.
Minimum PBR= Zero
Maximum PBR= 257 yards
100-yard sight-in= 4.77 inches high
.270 Win./130-grain Sierra GameKing BTSP/3,060 fps muzzle velocity/.436 B.C.
Minimum PBR= Zero
Maximum PBR= 364 yards
100-yard sight-in= 3.80 inches high
.300 Win. Mag./180-grain Trophy Copper/2,960 fps muzzle velocity/.523 B.C.
Minimum PBR= Zero
Maximum PBR= 361 yards
100-yard sight-in= 3.87 inches high
You’ll notice from these examples — and it should come as no great surprise — that the bullet’s speed and B.C. contribute greatly to its MPBR. Basically, the greater the speed and/or the higher the B.C, the longer the MPBR will be. If you have the luxury of a rifle range where you can shoot several hundred yards, you can check your results. Or, if you enjoy punching paper, you can determine MPBR through trial and error.
Using a 10-inch-diameter target, zero your rifle 3 inches high at 100 yards, then move back from the target to various distances (200, 300, 400 yards, etc.) and measure the range of the highest hit and the extreme distance when the bullet falls below your chosen vital zone. Peak trajectory (highest striking point within the vital area) usually falls between 150 and 200 yards (where your bullet drifts to the extreme top of the 10-inch circle, or 5 inches above bull’s eye). In the .270 Win. example above, you’ll move your 100-yard zero up (through trial and error) to 3.80 inches before the bullet strikes the vital zone at its peak trajectory. Now you can move back until you find the MPBR, the range where the bullet strikes 5 inches below the bull’s eye. Again, in the .270 Win. example, your MPBR will be 364 yards.
Things can happen quickly in the whitetail woods, and often do. By keeping things simple and applying the MPBR method of sighting-in your rifle, you’ll have the confidence to make a lethal shot out to 300 yards and beyond without the worry of knowing the precise distance to the animal. Forget about holdover, dealing with the clutter of hash marks or fumbling with a ranging turret, and focus on making the shot.
