It was amazing. I could glass the property line squatter’s stand. He was a mere 105 yards away from mine. Sitting along the edge on the hayfield, he was trying to intercept the deer coming off of my small lease.
What I found amazing wasn’t that he’d put his stand in a tree that the property fence ran through or that it was situated to shoot into my lease. Unfortunately, such acts happen far too frequently. What was amazing was how effective my food plot strategy had been in foiling his attempts.
During each sit on my half-acre food plot, I saw many deer, with the majority offering shot opportunities. Heck, from that stand I eventually arrowed the biggest buck in the area. However, a mere 105 yards away, the squatter saw next to nothing.
That’s precisely how powerful food plots can be. Unfortunately, the majority aren’t effective. They are often slapped into the easiest locations, with little thought invested into how they can maximize hunting opportunities. To get killer results from food plots, one must do more than the minimum.
Feed Plots, Kill Plots and Size
That starts with planning. Of course, sunlight, soil types, soils conditions, accessibility, and a host of factors need to be considered. For now, let’s focus on size, shape, and location assuming that the conditions are also suitable for planting.
Before we can begin, we must first differentiate between feed or kill plots. As the names imply, they serve distinctly different purposes. Feed plots are designed to both help keep deer on the property and address their nutritional needs. Kill plots are for hunting.
Because they are designed to be a primary food source, feed plots must be larger in size to sustain prolonged feeding. Furthermore, one must account for the competition factor. Most prime 40-acre-plus properties have more than one doe family group spending some time on the land. Each family group can consist of multiple generations of does and young that can be traced back to the matriarch doe. These family groups struggle for dominance much like bucks do during the rut. If the feed plot is too small, family groups and individual bucks are often driven off by the dominant family group and buck in the area.
To feed and hold the maximum number of resident deer on the property, one can approach feed plots in two ways. The least cost-effective method is to make feed plots large enough for the deer to share nicely. That size varies based on other available food choices and deer density, but requires comparatively more acreage.
The other option is breaking the feed plot into several plots, with each containing the same plantings. For example, three completely separate feed plots, each containing 1 acre of alfalfa and 4 acres of double-planted grain can support a minimum of three mature bucks and up to six family groups. One 15-acre plot will most likely lose one or more family groups and, once the bachelor groups break up, risks trimming the mature bucks to 1. The younger, subordinate bucks will also compete and disperse less with the illusion of reduced competition that the multiple-plot option provides.
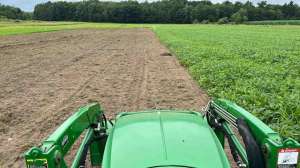
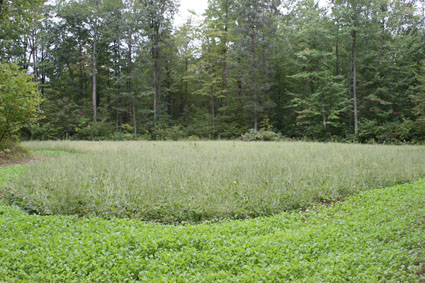
Conversely, kill plots should be small. After all, as the name implies, their purpose is for killing deer. Since bow range is limited, smaller, horseshoe, and “L” plots maximize shot opportunities. Along with that, within reason, the smaller the food plot, the safer the deer feel. All else being equal, a narrow half-acre food plot, completely surrounded by cover, will receive more daylight feeding activity than a square 5-acre plot.
Furthermore, orienting the plot so the outside apex of the horseshoe or L works with the prevailing fall wind direction is important in providing the maximum opportunities. With that, one can place stands on the outside and inside edge of the apex.
Additionally, the shape naturally funnels deer to your stand. From the apex, deer can see the entire food plot. Because of that, they gravitate to that area.
Finally, the kill plot should be no more than 30 yards wide. That further increases the odds of any deer entering the plot being within bow range. Though the shape and orientation isn’t important for feed plots, you can see why addressing both is extremely beneficial on kill plots. Minimizing near misses should be a priority, and these two factors do just that.
Food Plot Location
At first thought, the location of the feed plots may not seem overly important. After all, since hunting them isn’t a primary concern, who cares if the feeding occurs after dark? In fact, it works to our advantage if we can keep deer in the woods until after dark.
Still, location means everything for both the feed and kill plot. Ideally, they work in concert with each other. We want the bucks to stage in our small kill plots before venturing out to the feed plots after dark.
Maximizing location begins by determining where the bedding activity occurs. Next, one can plot the feed plot locations. Inside corners of existing fields and remote areas of open grass lands are both great choices. Deer tend to feel safe in these locations, but the relative openness still promotes twilight and nighttime activity.
With the bedding and feed plot locations identified, determine the most likely path deer will take between the two. Backing off around 100 to 200 yards from the feed plot is where our kill plot should be located.
Determining the precise location is a balance between conditions suitable to grow the planting and the ability to keep disturbances to a minimum when hunting, accessing, and departing the plot. Luckily, two of best planting choices for the kill plots are clovers and brassicas. Both are relatively easy to grow and don’t require ideal conditions.
 Pairing grains and greens helps feed plots provide nutrition throughout the entire year. |
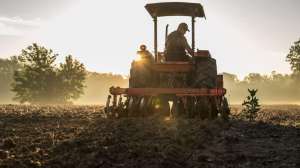
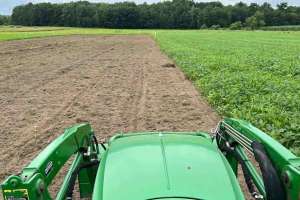
Of course, this type of placement will require some clearing work. A decent dozer operator can typically knock out three to five of these kill plots in a day, as well as complement each with a small waterhole. They can even pile the debris to form a barrier in front of the stand sites so the deer enter where you want them to. The costs generally fall under $500 for a day’s work.
For those on a tighter budget, all one really needs is a chainsaw and an ATV equipped with a sturdy disc. Remember, we’re not cash cropping here. So, if the plots contain some stumps, it’s not an issue.
Either way, carefully planning the location of the feed and kill plots can make the difference between arrowing the buck of your dreams and seeing virtually nothing. By then shaping and orienting the kill plot correctly, one stacks the odds for producing killer results.
Devil In the Details
The details often separate a thriving food plot from crop failure. Here are a few items that many overlook, but can prove to be real difference-makers.
Match the planting to soil types and conditions: For example, because of a relatively shallow fibrous root system, clovers will do very well in comparatively moist areas and heavy soil types. However, they do poorly in sandy, comparatively dry areas. Because of a deeper tap root system, alfalfas are better suited for lighter soils and can tolerate significantly lower moisture content.
Match the planting to amount of sunlight: Chicory, clovers, and even many brassicas can do well in as little as three hours of direct sunlight a day. Most grain crops, such as corn and soybeans, do much better with six or more hours. For the best possible food plot, matching the planting to the specifics of the location is critical.
Test soil pH and nutrient levels: Soils tests are cheap and easy. Simply collect tablespoon-size scoops of topsoil from evenly dispersed areas of your food plot until you have filled about half a sandwich baggie. Most seed dealers or the county agricultural office can send it away for testing. A few weeks later, you will get a report that details the exact fertilizer and lime requirements for your particular planting.
 Firm seedbeds are critical for broadcast seeds to realize high germination rates. |
Use lime wisely: Speaking of lime, not all limes are created equal. Limes range from fine to coarse grain. Pelletized lime is an extremely fine lime that has been bonded to form pellets. It breaks down in the soils very fast. The effects can begin within weeks. Barn lime is the opposite extreme. It’s so course that as much as 50 percent may never break down into usable form and can take many months to make a significant difference. Frankly, it shouldn’t be used for food plots. The field lime that is sold most often to farmers strikes a balance between the two extremes. In either case, one should realize that lime is not a permanent fix. The finer the grain, the quicker the impact, but also the faster it leeches from the soil. With pelletized lime, one often must reapply every year. Most field limes are commonly good for two or more years.
Prepare a proper seed bed: This is well worth the effort. Even the “no tills” that are available will do significantly better in properly prepared soils.
After disking, the soil should be cultipacked to create an even and firm bed. This is mission critical for small seeds not meant to be drilled. If the bed isn’t firm, a high percentage of seed is often covered too deep to ever break the surface.
For seeds that are drilled, all that is left is praying for rain, but broadcasted seeds should be cultipacked one last time. Doing so sinks the seeds into the soil and promotes a higher germination rate.
Maintain your planting: Weed competition is often the greatest challenge. Most all seed blends these days can be sprayed with herbicides. The trick is selecting the right one for the specific planting. The seed dealers can point you in the right direction.
Also, many greens can be mowed to knock back the weeds. Some plantings, such as clovers and alfalfas, need to be mowed to keep them in a highly digestible and nutritious state. When they reach 6 to 12 inches in height, knocking them down to approximately 4 inches does the trick.
One can never control rainfall. However, following the steps above will help give your food plot its best chance to thrive.