Instinctive bow shooting is defined as shooting without the aid of aiming devices or points of reference. In its pure form, instinctive shooting is performed just as you’d throw a stone or a ball — by looking at what you want to hit and letting ’er fly.
The key to accurate instinctive shooting is intense concentration with both eyes and the muscles that direct your arrow. For this to work, you must have established the fundamentals of bow shooting — a consistent and workable stance, hold, draw, release and follow-through — as well as possess the proper mental approach. It’s much more effective to begin with good habits than to break bad ones and start over.
Stance
Mastering the fundamentals of instinctive shooting starts with a good stance and hold. After years of practice, you might be able to shoot accurately from almost any position and even with your bow only partially drawn. But while you’re learning, use a consistent form that promotes accuracy.
If you’ve been shooting compounds, you probably stand at right angles to the target so that a line projected across the tips of your toes would intersect the bull’s-eye.
This can work with instinctive shooting, but many instinctive shooters have better results with a more open stance — with their bodies turned a bit more toward the target. This position makes it easier to bend the knees, bend the waist, and lean a bit forward in the traditional instinctive-shooting form, which aligns the arrow directly below the dominant eye.
Hand Position
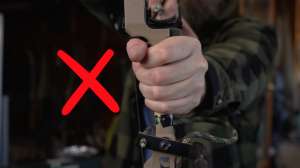
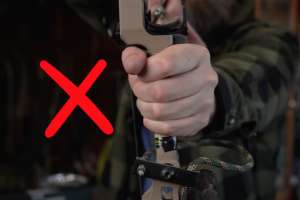
One of the most crucial factors in good instinctive-shooting form is the position in which you hold the bow hand, and the proper way to hold it will probably go against your natural tendency — which is to grab a big piece of the bow handle and distribute the pressure across your palm. The most accurate way is to hold it delicately, balanced, and without a grip, so that there is no uneven pressure that might twist the bow at the release and misdirect the arrow or bump it into wobbly flight. Simply rotate your wrist outward, away from the bow, almost to the point of discomfort, so the bow touches only the bottom of your thumb. Apply no pressure with your fingers. Some people take this “delicate grip” to the extreme and shoot with a fully open bow hand, fingers extended. But that’s unnecessary and a little risky. I can guarantee you’ll never catch me holding my $750 custom recurve in a way that could send it clattering down a rocky hillside. I close my fingers on the grip without squeezing.
 The position of your other hand, your string hand, is more complicated. Most archers use the split-finger, or Mediterranean, draw, with their index finger above the nock of the arrow and the next two fingers below it. Other people, myself included, prefer to shoot with all three fingers under the nock — the so-called Apache draw. It’s largely a matter of personal preferences, as each method has advantages and disadvantages.
Most people use split-finger because they’ve been taught that way, and because it feels more secure — it’s easy to keep the arrow on the string. It also more evenly distributes pressure on a bow’s limbs, because the bowstring is pulled closer to the center of the bow than it is with a three-fingers-under draw. But there are problems that can arise from split-finger, the biggest of which is arrow pinch. When the arrow is drawn, the fingers pinch the nock and can actually bend the arrow against the bow. This leads to poor arrow flight, especially when the degree of this bending varies from shot to shot.
By shooting with three fingers under the nock, you won’t torque the arrow shaft, but you tend to put more pressure than normal on the bow’s bottom limb. This can make your bow noisier and reduce its efficiency. You can avoid this problem if your bow is specially tillered for this style of shooting. Drawing with three fingers under the nock also gets the arrow a little closer to your eye, which seems to make shooting more precise.
Read about the most important step — shooting — in Part II!