Presented By ScentBlocker
So, let's assume we are pledged to tell the truth in this article as well as that wounding study. Let's discuss what is going on these days with all the poor shooting form, errant shots and missed and wounded deer? This topic and all the contributing factors are complex, the analysis is complex, and the many reasons for shooting poorly are complex. But the cure, if one can simply forget everything complex that has been done wrong for so long, is actually quite simple.
First, more times than not, the bow is not properly fitted to the shooter. The draw length is usually too long, extending the shooter past a position of proper form, compressed strength with room to expand, push, pull and follow through. Or the peep sight is not in proper location on the string requiring the shooter to twist and contort, making weird faces just to see through the peep sight. Or the weight of the bow is too high or too low resulting in form problems, and or poor arrow flight. Or, actually in many cases, all the above may apply.
The question begs to be asked, what must be done and how can we fix all of the problems that are so very prevalent with so very many bowhunters today? I promise you that this issue could be expounded upon for many pages as we look deep into the various problems and the cause for each one and then, how they compound together to rob us from the enjoyment of shooting our bows and bowhunting. But, the answers- and the cure- can be described briefly. The steps to accurate, confident shooting are simple enough to lay out right here.
Let's start with a bunch of basic foundational reminders that, combined with the proper shooting technique, which we will get to in a minute, will contribute to great form and amazing accuracy.
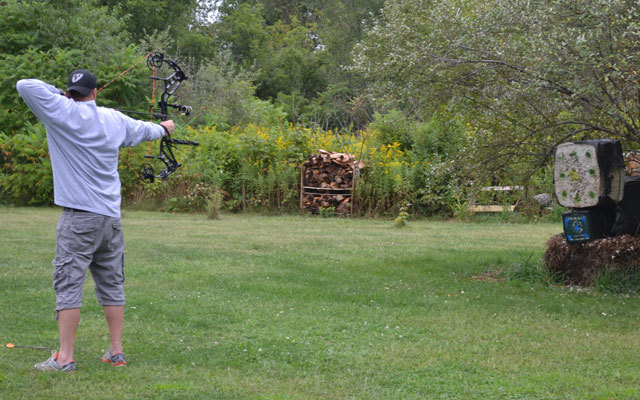
1. Proper Stance And Positioning
Your feet should be spread even with shoulder width, perpendicular to the target (just like your stance in the batter box facing the pitcher), even weight distribution on both feet, upright and straight that a plumb line from your center neck spine would follow your spine straight down the rear seam of your jeans to the ground directly centered between your feet. Note; you will shoot better with a pair of shoes with heels rather than flip flops or flat bottom sole like sneakers. This is not critical, but it is another fine point you may wish to consider.
2. Fit Of The Bow
Assume your straight, balanced and aligned stance described in #1 with bow in hand. Hold the bow up (undrawn) and point it at the target. Be aware of your body position as it should be exactly as described above. Note especially the straight alignment of your spine down the center of your pants to ground. Next note the comfortable and natural position of your head and as you look at your bow and toward the target. Now, here's the important point of all of this; nock an arrow and go to full draw. If any of your body position has changed there is something amiss with your bow set-up, adjustment and fit to your body. Make sense? Typically at full draw the archer must lean back slightly, because the drawn length is too long, so that the alignment down the spine is compromised and bent, and, often the head is cocked one way or another to see through the peepsight.
3. See Steps 1 And 2
I don't recommend too much effort attempting to shoot well until all the form and fit issues in #1 and #2 are addressed. You will be amazed how much easier, more comfortable, and more accurate you will be able to shoot once these adjustments are made.
For the sake of this instruction, let's assume any and all adjustments needed have been made. Now we are ready to shoot one arrow. I recommend getting very close to your target butt, say 10 feet. The reason for being so close is to minimize any noticeable “wobbles” while aiming and holding steady on the bullseye. Everyone has a hard time holding the bow perfectly still, so this distance is much more forgiving when we're working on shooting form. There are a couple additional things you will need to do before we shoot the first arrow: make sure you have a wrist sling loosely fit around your wrist and, your release must be adjusted to a very light, but safe, trigger pull (you'll appreciate this later).
What we've done within the steps above is care for the mechanical and physical aspects of the archer’s form, the equipment, how it's adjusted, and how it fits. We will not need to do much there again.